NFS服务器搭建 服务端安装步骤 安装NFS和rpcbind
1 yum install rpcbind nfs-utils -y
启动服务并设置开机自启
说明
1
2
3
4
systemctl start rpcbind systemctl enable rpcbind systemctl start nfs-server systemctl enable nfs-server
创建共享目录(以/data为例)
编辑/etc/exports文件配置,添加以下内容
1 /data 10.211.55.0/24(rw,async,no_root_squash)
配置文件说明
参数
作用
ro
只读
rw
读写
root_squash
当NFS客户端以root管理员访问时,映射为NFS服务器的匿名用户
no_root_squash
当NFS客户端以root管理员访问时,映射为NFS服务器的root管理员
all_squash
无论NFS客户端使用什么账户访问,均映射为NFS服务器的匿名用户
sync
同时将数据写入到内存与硬盘中,保证不丢失数据
async
优先将数据保存到内存,然后再写入硬盘;这样效率更高,但可能会丢失数据
重新加载NFS服务,使配置生效
1 systemctl reload nfs-server
客户端挂载验证 在客户端安装nfs-utils
1 yum install nfs-utils -y
使用showmount命令查看NFS服务器共享信息,输出格式为"共享的目录名称 允许使用客户端地址"
1 showmount -e 10.211.55.13
在客户端创建挂载目录(以/data为例),并挂载共享目录
1 2 3 4 5 6 7 8 9 10 11 12 13 14 mkdir -p /datamount 10.211.55.13:/data /data df -h10.211.55.13:/data 62G 3.8G 56G 7% /data umount /data rm -rf /data
至此NFS服务器搭建完毕。
K8S创建使用NFS StorageClass 手动创建pv和pvc测试验证NFS是否可用 在所有k8s node节点安装NFS客户端,并通过showmount -e查看NFS服务器共享信息
1
2
yum install nfs-utils -y showmount -e 10.211.55.13
手动创建pv和pvc
PersistentVolume中的path参数修改为NFS共享目录的路径,本文中为/data
PersistentVolume中的server参数修改为NFS服务器IP地址,本文中为10.211.55.13
1 2 3 4 5 6 7 8 9 10 11 12 13 14 15 16 17 18 19 20 21 22 23 24 25 26 27 28 29 30 31 32 33 34 35 36 37 38 39 40 41 42 43 44 45 46 47 48 49 50 51 52 cat > /root/pv-pvc-test.yaml << EOF --- apiVersion: v1 kind: PersistentVolume metadata: name: pv-test spec: capacity: storage: 1Gi accessModes: - ReadWriteOnce persistentVolumeReclaimPolicy: Recycle nfs: path: /data server: 10.211.55.13 --- kind: PersistentVolumeClaim apiVersion: v1 metadata: name: pvc-test spec: accessModes: - ReadWriteOnce resources: requests: storage: 1Gi --- apiVersion: v1 kind: Pod metadata: name: pvc-test-pod spec: containers: - name: pvc-test-pod image: nginx imagePullPolicy: IfNotPresent command: ["sleep", "60000"] volumeMounts: - name: nfs-vol mountPath: /usr/share/nfsvol readOnly: false volumes: - name: nfs-vol persistentVolumeClaim: claimName: pvc-test EOF kubectl apply -f /root/pv-pvc-test.yaml
创建之后查看绑定信息,可以看到已经成功绑定了,pod也正常运行,说明k8s中可以使用这个NFS,执行kubectl delete -f /root/pv-pvc-test.yaml删除测试pv和pvc然后继续下一步开始创建StorageClass。
创建NFS StorageClass Kubernetes NFS-Client Provisioner:https://github.com/kubernetes-retired/external-storage/tree/master/nfs-client
创建namespace配置清单namespace.yaml
1
2
3
4
5
--- apiVersion: v1 kind: Namespace metadata: name: nfs
创建deployment配置清单deployment.yaml
[NFS-SERVER-IP]修改为NFS服务器IP地址,本文中为10.211.55.13[NFS-SERVER-PATH]修改为NFS服务器共享目录路径,本文中为/data
1
2
3
4
5
6
7
8
9
10
11
12
13
14
15
16
17
18
19
20
21
22
23
24
25
26
27
28
29
30
31
32
33
34
35
36
37
38
39
40
--- apiVersion: apps/v1 kind: Deployment metadata: name: nfs-client-provisioner labels: app: nfs-client-provisioner namespace: nfs spec: replicas: 1 strategy: type: Recreate selector: matchLabels: app: nfs-client-provisioner template: metadata: labels: app: nfs-client-provisioner spec: serviceAccountName: nfs-client-provisioner containers: - name: nfs-client-provisioner image: quay.io/external_storage/nfs-client-provisioner:latest volumeMounts: - name: nfs-client-root mountPath: /persistentvolumes env: - name: PROVISIONER_NAME value: fuseim.pri/ifs - name: NFS_SERVER value: [NFS-SERVER-IP ] - name: NFS_PATH value: [NFS-SERVER-PATH ] volumes: - name: nfs-client-root nfs: server: [NFS-SERVER-IP ] path: [NFS-SERVER-PATH ]
创建storageclass配置清单storageclass.yaml
1
2
3
4
5
6
7
8
9
10
--- apiVersion: storage.k8s.io/v1 kind: StorageClass metadata: name: managed-nfs-storage annotations: "storageclass.kubernetes.io/is-default-class": "true" provisioner: fuseim.pri/ifs parameters: archiveOnDelete: "false"
创建rbac配置清单rbac.yaml
1
2
3
4
5
6
7
8
9
10
11
12
13
14
15
16
17
18
19
20
21
22
23
24
25
26
27
28
29
30
31
32
33
34
35
36
37
38
39
40
41
42
43
44
45
46
47
48
49
50
51
52
53
54
55
56
57
58
59
60
61
62
63
64
65
66
--- apiVersion: v1 kind: ServiceAccount metadata: name: nfs-client-provisioner namespace: nfs --- kind: ClusterRole apiVersion: rbac.authorization.k8s.io/v1 metadata: name: nfs-client-provisioner-runner rules: - apiGroups: ["" ] resources: ["persistentvolumes" ] verbs: ["get" , "list" , "watch" , "create" , "delete" ] - apiGroups: ["" ] resources: ["persistentvolumeclaims" ] verbs: ["get" , "list" , "watch" , "update" ] - apiGroups: ["storage.k8s.io" ] resources: ["storageclasses" ] verbs: ["get" , "list" , "watch" ] - apiGroups: ["" ] resources: ["events" ] verbs: ["create" , "update" , "patch" ] --- kind: ClusterRoleBinding apiVersion: rbac.authorization.k8s.io/v1 metadata: name: run-nfs-client-provisioner subjects: - kind: ServiceAccount name: nfs-client-provisioner namespace: nfs roleRef: kind: ClusterRole name: nfs-client-provisioner-runner apiGroup: rbac.authorization.k8s.io --- kind: Role apiVersion: rbac.authorization.k8s.io/v1 metadata: name: leader-locking-nfs-client-provisioner namespace: nfs rules: - apiGroups: ["" ] resources: ["endpoints" ] verbs: ["get" , "list" , "watch" , "create" , "update" , "patch" ] --- kind: RoleBinding apiVersion: rbac.authorization.k8s.io/v1 metadata: name: leader-locking-nfs-client-provisioner namespace: nfs subjects: - kind: ServiceAccount name: nfs-client-provisioner namespace: nfs roleRef: kind: Role name: leader-locking-nfs-client-provisioner apiGroup: rbac.authorization.k8s.io
应用配置清单
1 kubectl apply -f namespace.yaml -f deployment.yaml -f rbac.yaml -f storageclass.yaml
确认nfs-client-provisioner pod处于Running状态
测试验证 通过下面的配置清单测试NFS StorageClass是否可用
1
2
3
4
5
6
7
8
9
10
11
12
13
14
15
16
17
18
19
20
21
22
23
24
25
26
27
28
29
30
31
32
33
34
35
36
37
38
39
40
41
42
43
44
45
46
47
48
49
50
51
52
53
54
55
56
57
58
59
60
61
62
63
64
65
66
cat > /root/test-claim.yaml << EOF --- kind: PersistentVolumeClaim apiVersion: v1 metadata: name: test-claim spec: storageClassName: managed-nfs-storage accessModes: - ReadWriteMany resources: requests: storage: 1Gi --- kind: Deployment apiVersion: apps/v1 metadata: name: test-deployment labels: app: test-deployment spec: replicas: 1 selector: matchLabels: app: test-deployment template: metadata: labels: app: test-deployment spec: containers: - name: test-deployment image: nginx imagePullPolicy: IfNotPresent ports: - name: http containerPort: 80 protocol: TCP volumeMounts: - name: nfs-pvc mountPath: "/usr/share/nginx/html" volumes: - name: nfs-pvc persistentVolumeClaim: claimName: test-claim --- apiVersion: v1 kind: Service metadata: labels: app: test-deployment name: test-deployment spec: ports: - port: 80 protocol: TCP targetPort: 80 nodePort: 32000 selector: app: test-deployment type: NodePort EOF kubectl apply -f /root/test-claim.yaml
说明 在Kubernetes 1.20.0版本上可能出现“unexpected error getting claim reference: selfLink was empty, can’t make reference”的报错,可参考以下链接进行处理https://github.com/kubernetes-sigs/nfs-subdir-external-provisioner/issues/25
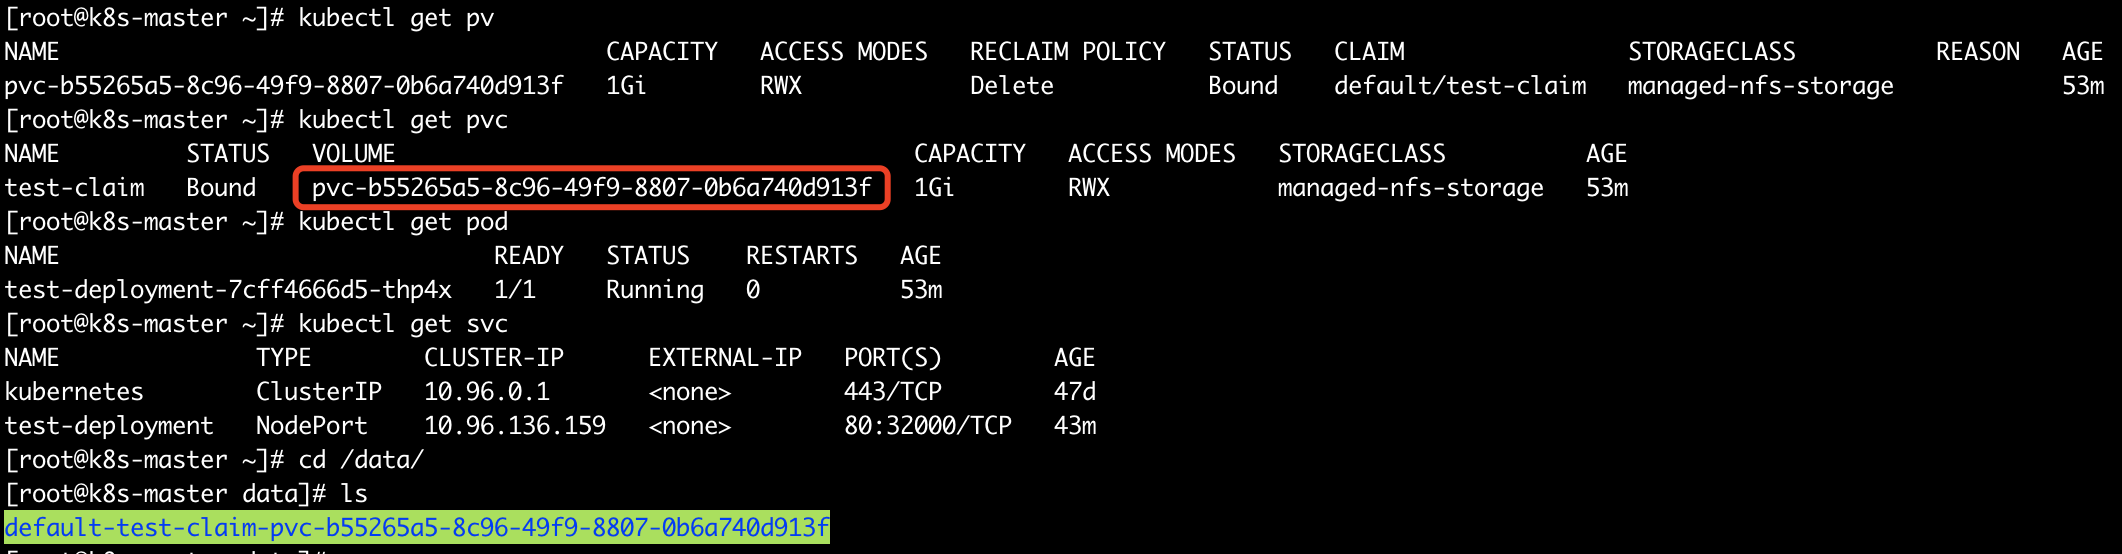
应用后如果配置正确的话可以发现pv、pvc和pod还有svc都成功创建,此时到NFS服务端的工作目录,可以看到自动创建了一个文件夹,从文件夹名称可以看到是与pv对应的。
继续在NFS共享目录pv所对应的文件夹中创建一个index.html文件
然后通过svc访问服务看是否生效
页面也可以正常访问,说明pod挂载的卷确实映射到NFS服务共享出来的目录中了,最后执行 kubectl delete -f /root/test-claim.yaml删除测试资源。