之前介绍过通过Ollama在单机多卡环境部署DeepSeek模型 ,但对于单台服务器来说,受限于空间、功耗、散热,能塞入的GPU数量是有限的,一般也就8卡、12卡,因此避免不了需要在多机多卡环境中部署模型,而Ollama只支持单机多卡,这时候就需要用到vLLM ,一个快速且易于使用的LLM推理和服务库。
环境信息
配置
操作系统
内网IP
公网IP
角色
32 vCPUs 256GB 500G系统盘 直通型GPU: 4 * T4(64GB)
CentOS7.9
172.16.1.21
36.251.185.124
head
32 vCPUs 256GB 500G系统盘 直通型GPU: 4 * T4(64GB)
CentOS7.9
172.16.1.169
36.249.107.172
worker
说明 /根目录预留足够大的空间用于存储模型文件和部分组件的数据(例如Docker)
YUM源配置
说明 阿里云的CentOS源
1
2
3
4
5
cd /etc/yum.repos.d/mkdir backupmv * backup/curl -o /etc/yum.repos.d/CentOS-Base.repo https://mirrors.aliyun.com/repo/Centos-7.repo yum clean all
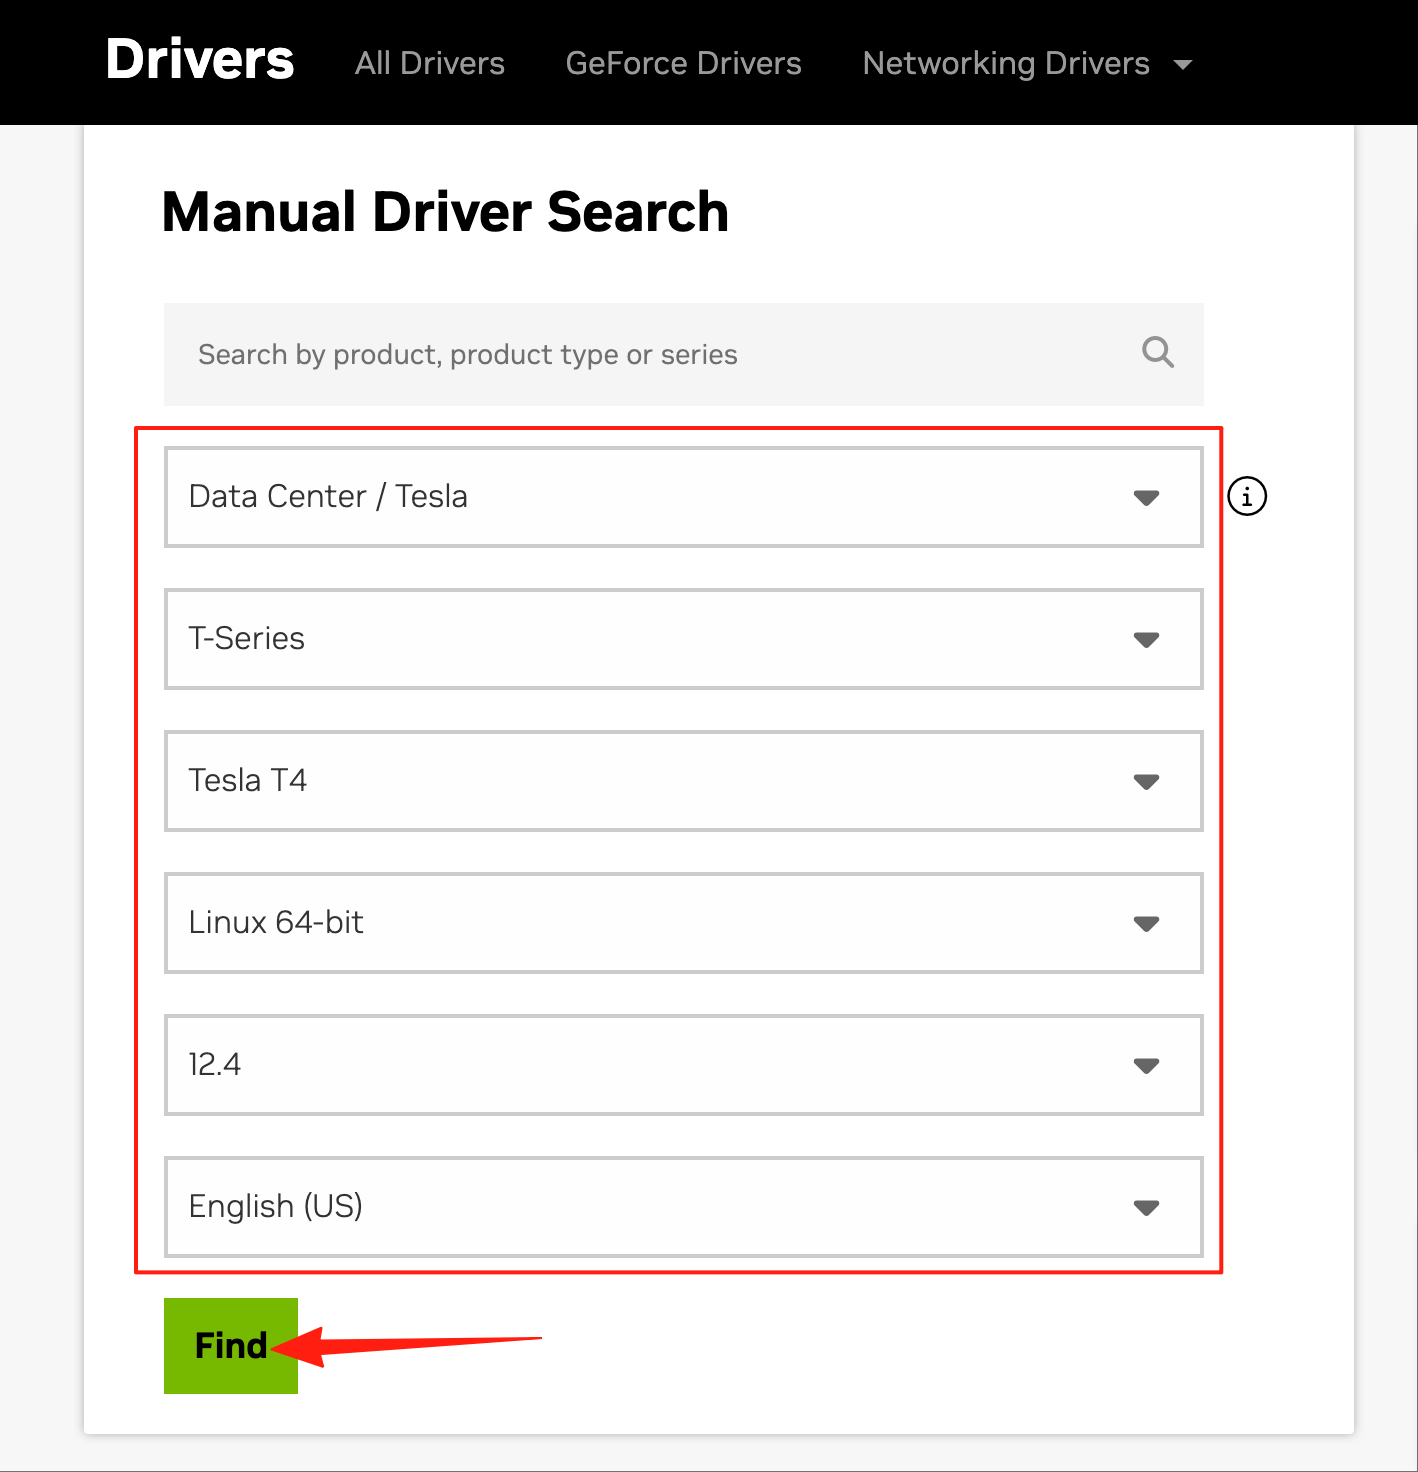
安装显卡驱动和CUDA 下载显卡驱动和CUDA安装包 访问Download The Official NVIDIA Drivers | NVIDIA ,根据实际情况选择对应的显卡型号、平台类型和CUDA版本,点击“Find”
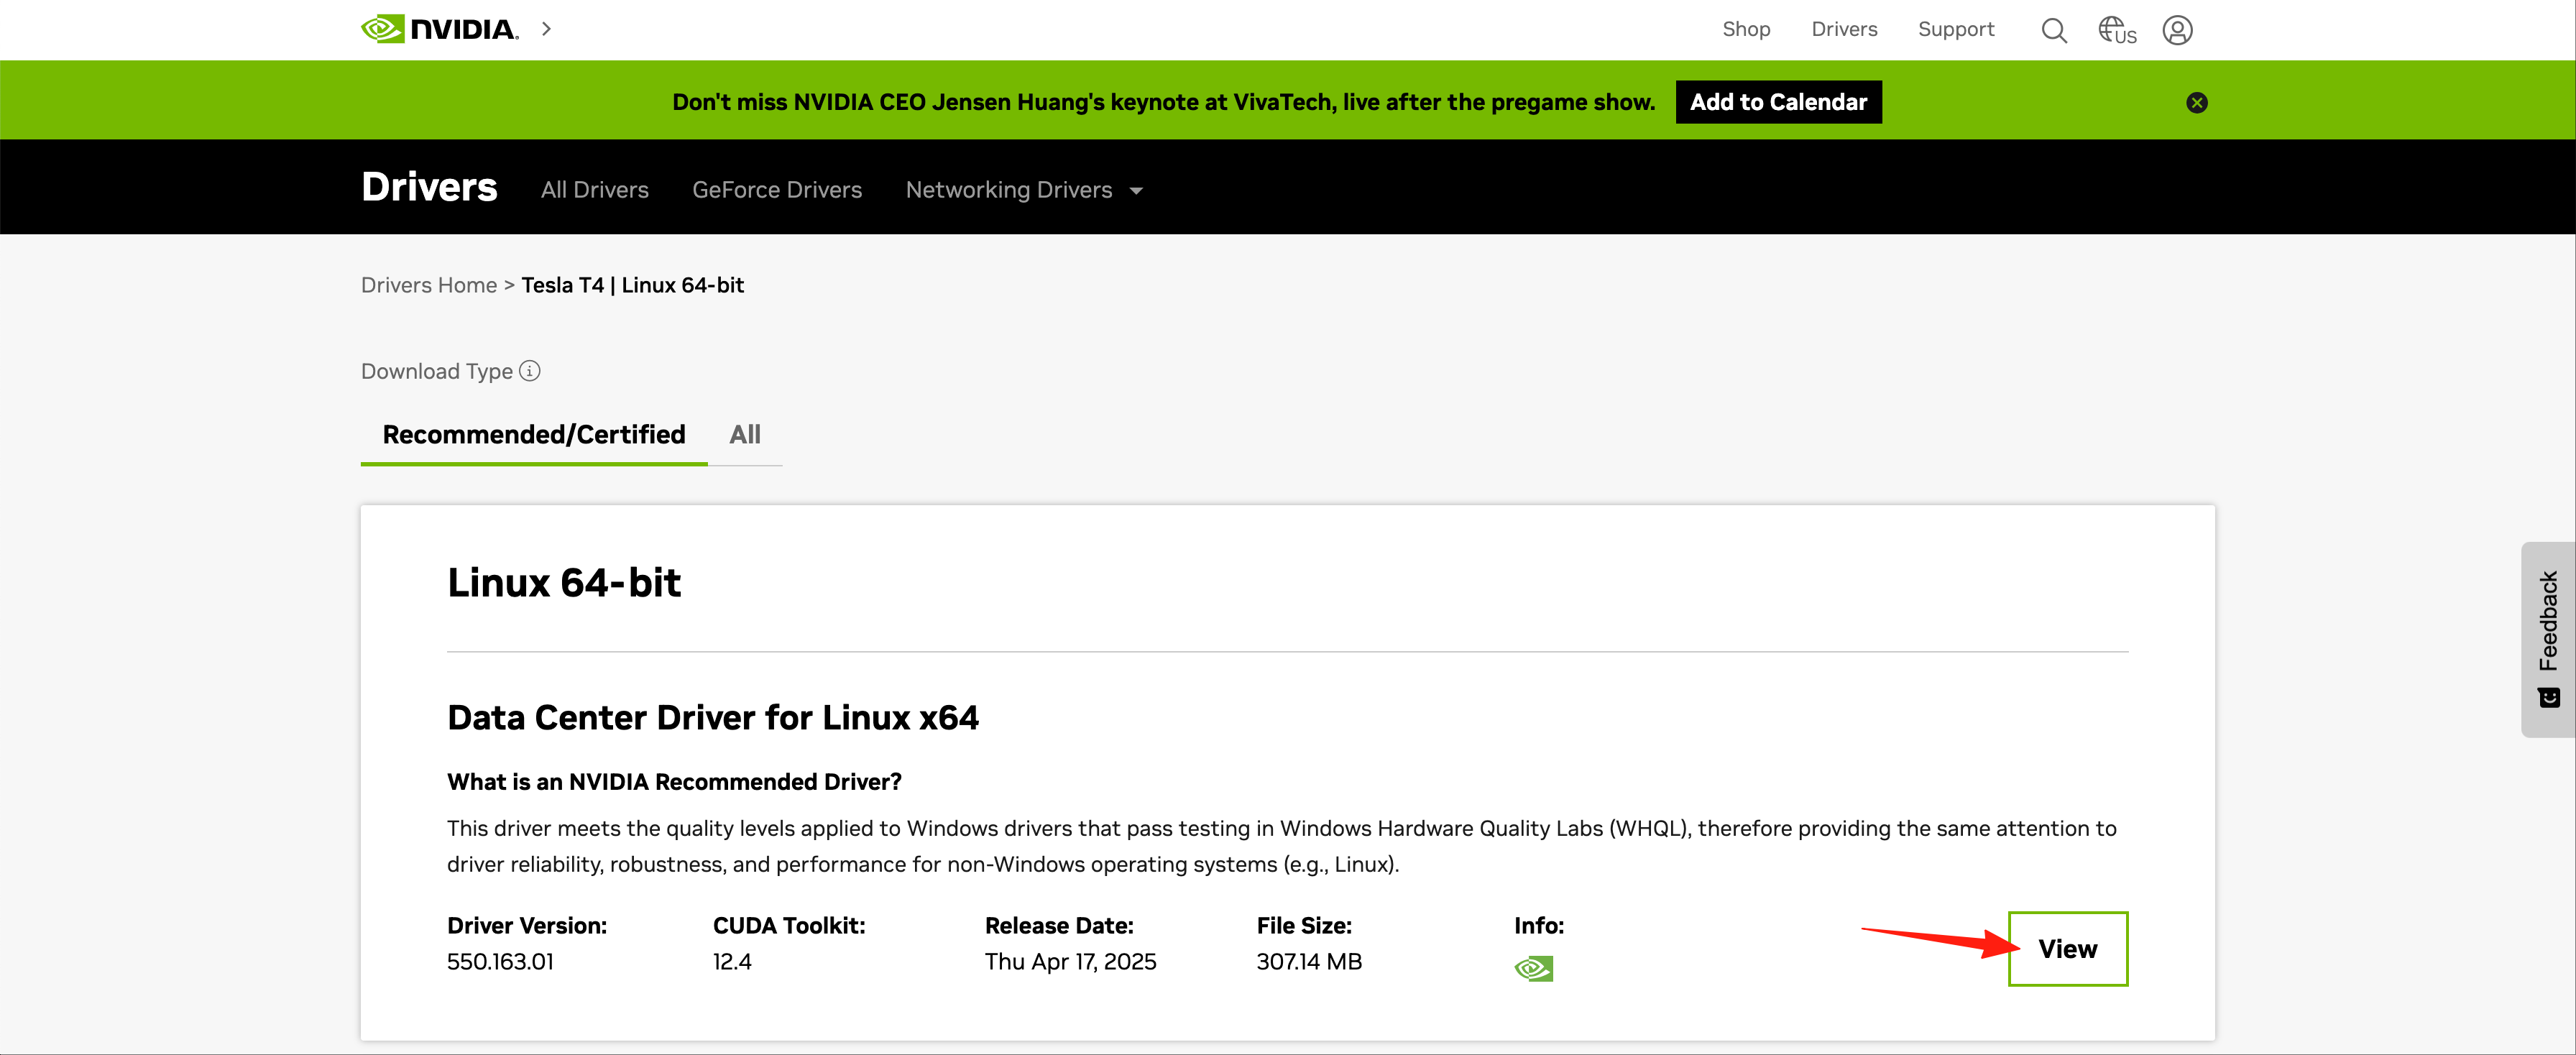
点击“View”
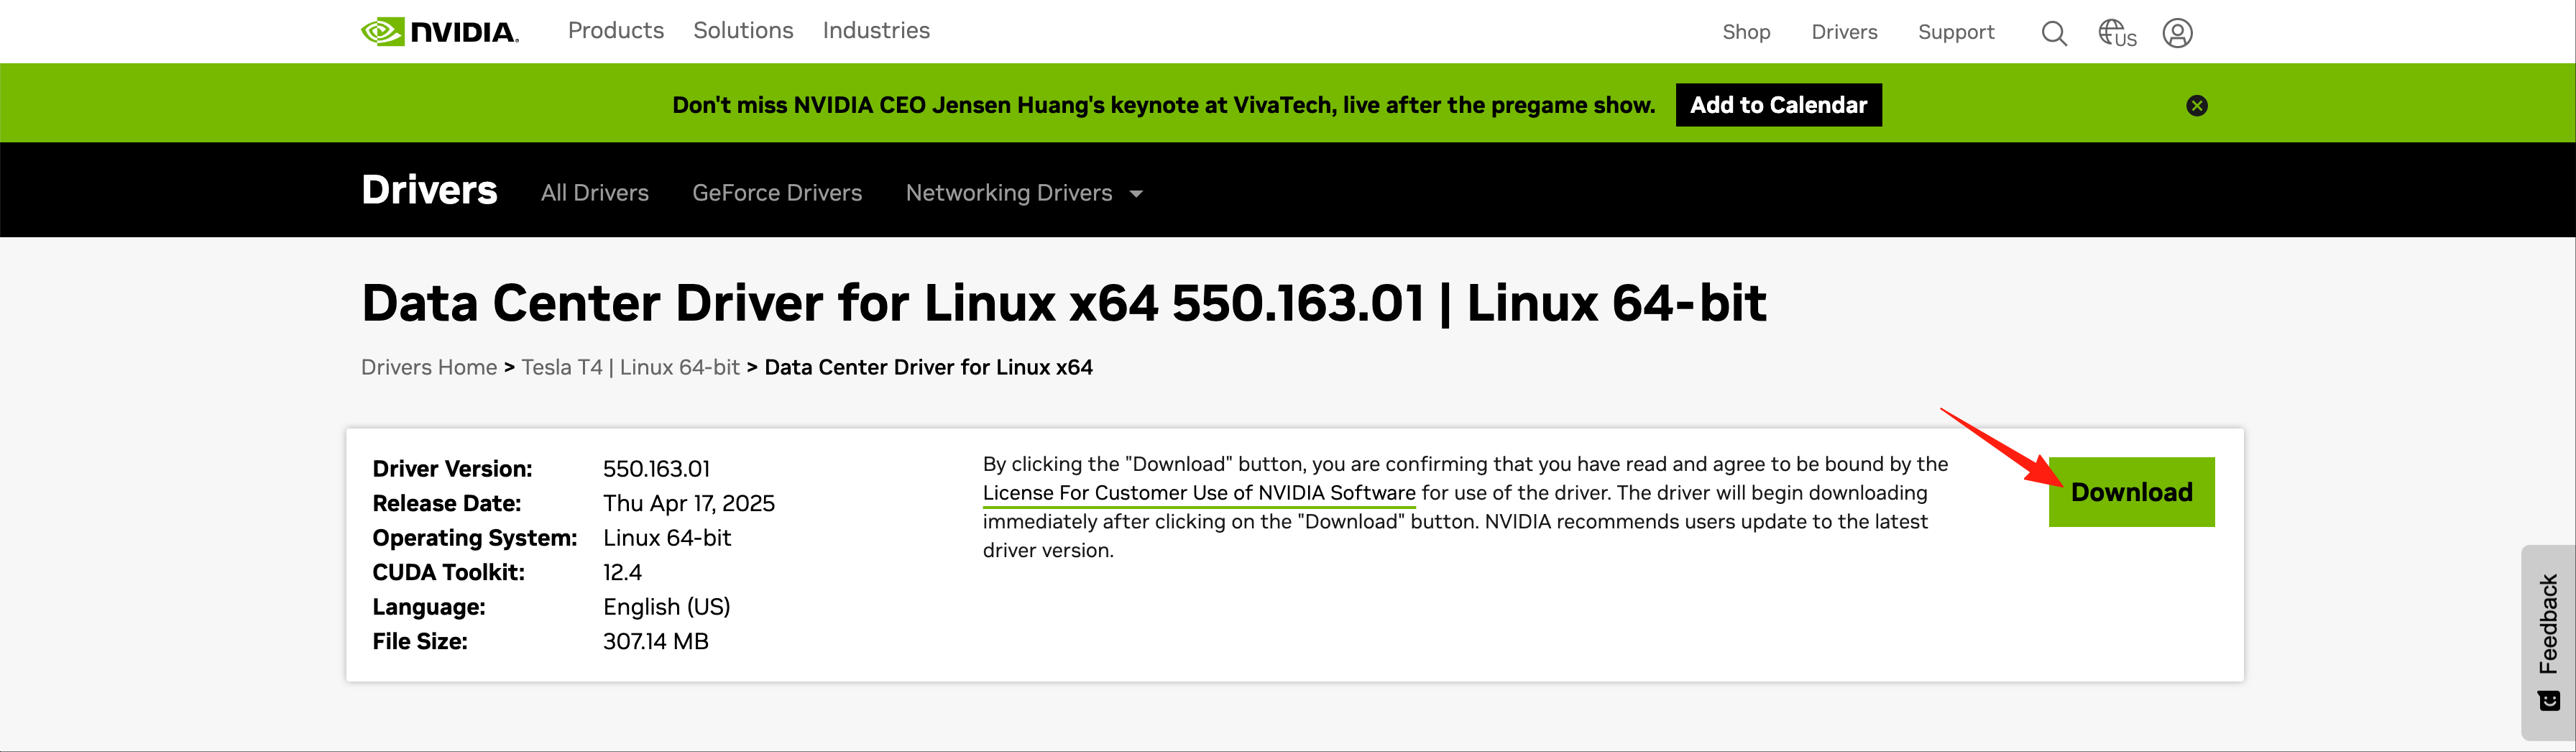
点击“Download”开始下载,待下载完成后上传到服务器/root目录下
查询并禁用nouveau模块
说明
执行以下命令查询nouveau模块是否加载
如果加载了nouveau模块,则执行以下命令禁用,否则忽略此步
1 2 3 4 5 6 7 8 9 10 cat > /usr/lib/modprobe.d/blacklist-nouveau.conf << EOF blacklist nouveau options nouveau modeset=0 EOF dracut -f systemctl set-default multi-user.target systemctl get-default
重启服务器
确认nouveau模块没有启用
安装显卡驱动 1 2 3 cd /root/chmod +x NVIDIA-Linux-x86_64-550.163.01.run./NVIDIA-Linux-x86_64-550.163.01.run
验证显卡驱动 执行以下命令可以正常查看到显卡信息说明显卡驱动安装成功
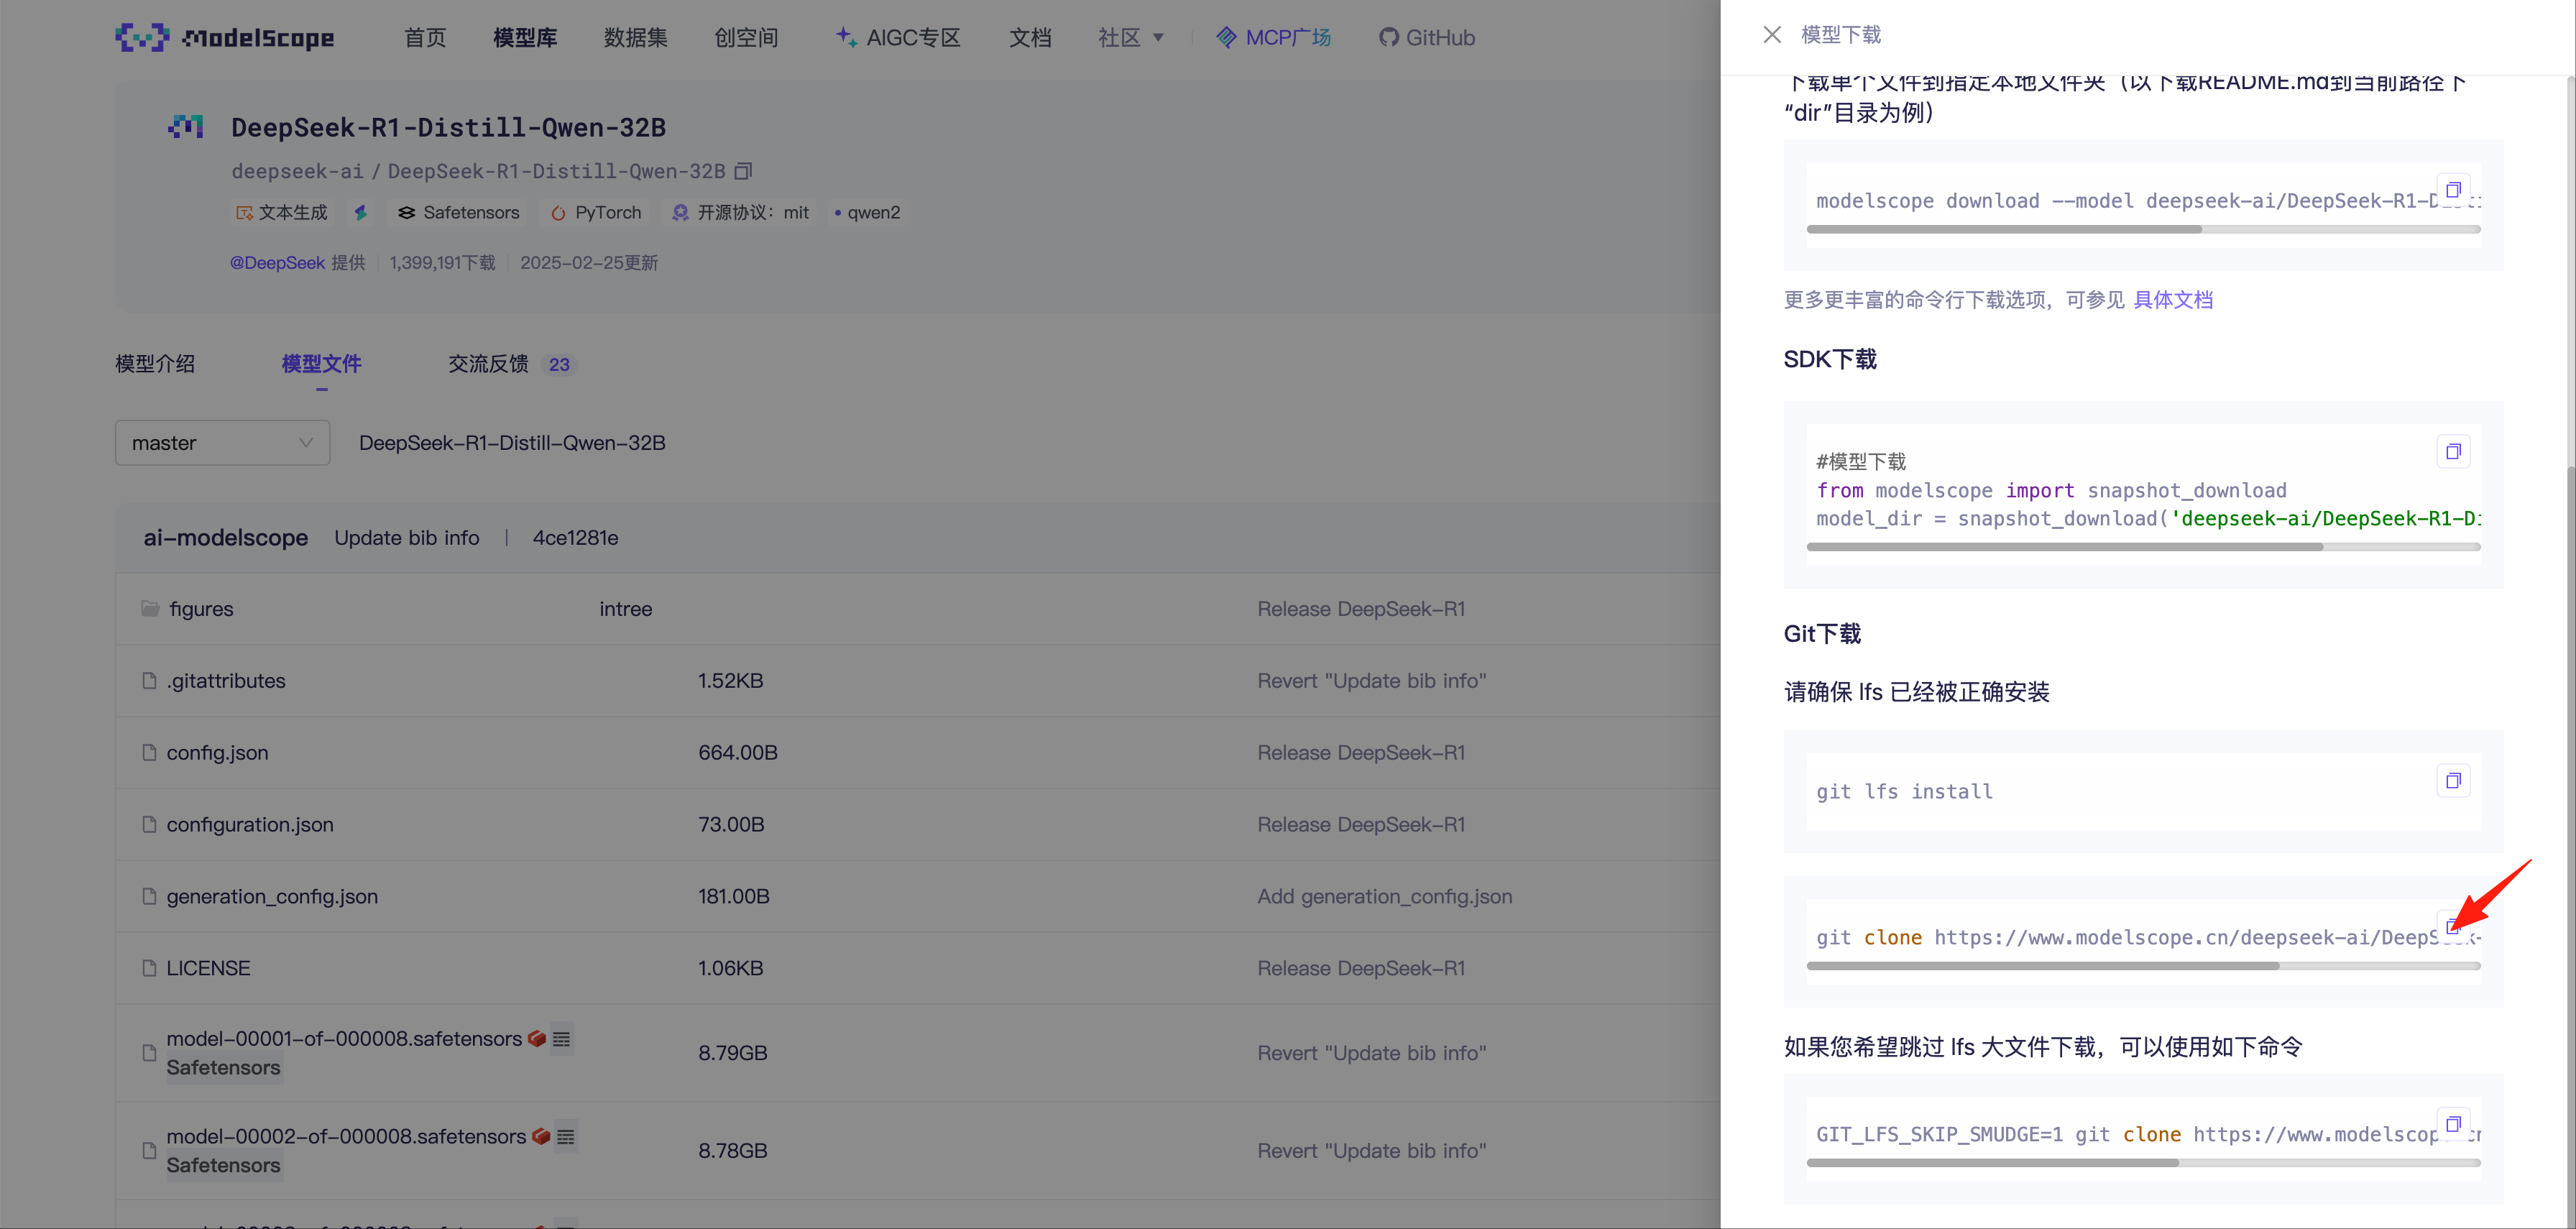
下载模型 前往huggingface.co 或者魔搭社区 下载所需模型,本文以从魔搭社区下载DeepSeek-R1-Distill-Qwen-32B为例,模型存放目录为/data/
说明
安装Git和Git LFS(Large File Storage) 安装Git
配置Git LFS的YUM源
1 curl -s https://packagecloud.io/install/repositories/github/git-lfs/script.rpm.sh | sudo bash
安装Git LFS
说明 魔法
拉取模型 访问魔搭社区 ,选择“模型库”,搜索“DeepSeek-R1-Distill-Qwen-32B”
选择“模型文件”,点击“下载模型”
下拉找到Git下载,复制模型对应的git clone命令到服务器执行,拉取模型需要较长时间,请耐心等待。
1 2 cd /data/git clone https://www.modelscope.cn/deepseek-ai/DeepSeek-R1-Distill-Qwen-32B.git
安装Docker 二进制包下载地址:https://download.docker.com/linux/static/stable/
到对应平台的目录下载所需版本的Docker二进制包,并上传到所有节点的/root目录下(本文以x86平台下的28.2.2为例),然后依次在所有节点上执行以下命令安装Docker
1 2 3 4 5 6 7 8 9 10 11 12 13 14 15 16 17 18 19 20 21 22 23 24 25 26 27 28 29 30 31 32 33 34 35 36 37 38 39 40 41 42 43 44 45 46 47 48 cd /root/tar zxf docker-28.2.2.tgz chmod 755 docker/*cp -a docker/* /usr/bin/cat > /usr/lib/systemd/system/docker.service << EOF [Unit] Description=Docker Application Container Engine Documentation=https://docs.docker.com After=network-online.target firewalld.service containerd.service Wants=network-online.target [Service] Type=notify ExecStart=/usr/bin/dockerd ExecReload=/bin/kill -s HUP \$MAINPID TimeoutSec=0 RestartSec=2 Restart=always StartLimitBurst=3 StartLimitInterval=60s LimitNOFILE=1048576 LimitNPROC=1048576 LimitCORE=infinity TasksMax=infinity Delegate=yes KillMode=process [Install] WantedBy=multi-user.target EOF mkdir -p /etc/dockercat > /etc/docker/daemon.json <<EOF { "registry-mirrors": ["https://lerc8rqe.mirror.aliyuncs.com"], "exec-opts": ["native.cgroupdriver=systemd"] } EOF systemctl daemon-reload systemctl start docker systemctl enable docker systemctl status docker
安装vLLM集群运行环境 拉取vLLM Docker镜像 1 docker pull vllm/vllm-openai
说明 魔法
下载vLLM集群启动脚本run_cluster.sh 1 curl -s -L https://raw.githubusercontent.com/vllm-project/vllm/refs/heads/main/examples/online_serving/run_cluster.sh -o /root/run_cluster.sh
配置NVIDIA Container Toolkit YUM源
1 2 curl -s -L https://nvidia.github.io/libnvidia-container/stable/rpm/nvidia-container-toolkit.repo | \ sudo tee /etc/yum.repos.d/nvidia-container-toolkit.repo
安装NVIDIA Container Toolkit软件包
1 yum install nvidia-container-toolkit -y
配置Docker GPU运行环境
说明
1 2 nvidia-ctk runtime configure --runtime=docker systemctl restart docker
启动vLLM集群 启动head主节点 1 2 3 4 5 6 7 8 9 10 11 12 13 14 15 16 17 18 nohup sudo bash run_cluster.sh \ vllm/vllm-openai:latest \ 172.16.1.21 \ --head \ /data \ -e VLLM_HOST_IP=172.16.1.21 \ -e GLOO_SOCKET_IFNAME=eth0 & tail -f nohup.out
启动worker从节点
说明
1 2 3 4 5 6 7 8 9 10 11 12 13 14 15 16 17 18 nohup sudo bash run_cluster.sh \ vllm/vllm-openai:latest \ 172.16.1.21 \ --worker \ /data \ -e VLLM_HOST_IP=172.16.1.169 \ -e GLOO_SOCKET_IFNAME=eth0 & tail -f nohup.out
检查vLLM集群状态
说明
1 2 3 4 5 6 docker ps -a docker exec -ti node ray status
以我的查询结果为例,显示有2台Active的节点,一共有64核CPU、8张GPU卡、482G内存,跟我两台服务器的配置是相符合的
1 2 3 4 5 6 7 8 9 10 11 12 13 14 15 16 17 18 19 20 21 22 23 ======== Autoscaler status: 2025-06-06 01:02:11.424857 ======== Node status --------------------------------------------------------------- Active: 1 node_49aa06aa19c6063168dd87514c7628b7c3d6631b98dcb4b6f2a50eb5 1 node_31f6b71bd77ed1628029f35dee5bb4bbba80c53974f82b999d9a2a1e Pending: (no pending nodes) Recent failures: (no failures) Resources --------------------------------------------------------------- Usage: 0.0/64.0 CPU 0.0/8.0 GPU 0B/482.89GiB memory 0B/19.46GiB object_store_memory Constraints: (no request_resources() constraints) Demands: (no resource demands)
进入head容器内启动推理服务
说明
1 2 3 4 5 6 7 8 9 10 11 12 13 14 15 16 17 18 19 docker ps -a docker exec -ti node bash nohup vllm serve /root/.cache/huggingface/DeepSeek-R1-Distill-Qwen-32B \ --served-model-name DeepSeek-R1-Distill-Qwen-32B \ --port 8000 \ --gpu-memory-utilization 0.90 \ --max-model-len=16384 \ --tensor-parallel-size 4 \ --pipeline-parallel-size 2 \ --dtype=half & tail -f nohup.out
参数
说明
示例
/root/.cache/huggingface/DeepSeek-R1-Distill-Qwen-32B模型目录,容器内模型目录固定为/root/.cache/huggingface/开头,该目录指向为run_cluster.sh参数中配置的映射的模型目录
/root/.cache/huggingface/DeepSeek-R1-Distill-Qwen-32B
--served-model-name设置模型名称,用于接口中指定模型
DeepSeek-R1-Distill-Qwen-32B
--port指定暴露的API端口
8000
--gpu-memory-utilization设置占用的最大显卡内存比例,0.9则为90%
0.9
--max-model-len设置最大模型上下文长度
16384
--tensor-parallel-size此处填单台服务器的显卡数量
4
--pipeline-parallel-size此处填服务器数量
2
--dtype指定使用的数据类型
half
待出现以下启动日志,代表推理服务已经启动成功
1 2 3 4 5 6 7 8 9 10 11 12 13 14 15 16 17 18 19 20 21 22 23 24 25 26 27 28 INFO 06-06 02:42:48 [api_server.py:1090] Starting vLLM API server on http://0.0.0.0:8000 INFO 06-06 02:42:48 [launcher.py:28] Available routes are: INFO 06-06 02:42:48 [launcher.py:36] Route: /openapi.json, Methods: GET, HEAD INFO 06-06 02:42:48 [launcher.py:36] Route: /docs, Methods: GET, HEAD INFO 06-06 02:42:48 [launcher.py:36] Route: /docs/oauth2-redirect, Methods: GET, HEAD INFO 06-06 02:42:48 [launcher.py:36] Route: /redoc, Methods: GET, HEAD INFO 06-06 02:42:48 [launcher.py:36] Route: /health, Methods: GET INFO 06-06 02:42:48 [launcher.py:36] Route: /load, Methods: GET INFO 06-06 02:42:48 [launcher.py:36] Route: /ping, Methods: GET, POST INFO 06-06 02:42:48 [launcher.py:36] Route: /tokenize, Methods: POST INFO 06-06 02:42:48 [launcher.py:36] Route: /detokenize, Methods: POST INFO 06-06 02:42:48 [launcher.py:36] Route: /v1/models, Methods: GET INFO 06-06 02:42:48 [launcher.py:36] Route: /version, Methods: GET INFO 06-06 02:42:48 [launcher.py:36] Route: /v1/chat/completions, Methods: POST INFO 06-06 02:42:48 [launcher.py:36] Route: /v1/completions, Methods: POST INFO 06-06 02:42:48 [launcher.py:36] Route: /v1/embeddings, Methods: POST INFO 06-06 02:42:48 [launcher.py:36] Route: /pooling, Methods: POST INFO 06-06 02:42:48 [launcher.py:36] Route: /score, Methods: POST INFO 06-06 02:42:48 [launcher.py:36] Route: /v1/score, Methods: POST INFO 06-06 02:42:48 [launcher.py:36] Route: /v1/audio/transcriptions, Methods: POST INFO 06-06 02:42:48 [launcher.py:36] Route: /rerank, Methods: POST INFO 06-06 02:42:48 [launcher.py:36] Route: /v1/rerank, Methods: POST INFO 06-06 02:42:48 [launcher.py:36] Route: /v2/rerank, Methods: POST INFO 06-06 02:42:48 [launcher.py:36] Route: /invocations, Methods: POST INFO 06-06 02:42:48 [launcher.py:36] Route: /metrics, Methods: GET INFO: Started server process [757] INFO: Waiting for application startup. INFO: Application startup complete.
调用测试 通过curl或者postman等API调试工具进行调用测试,其中model要和启动推理服务时指定的--served-model-name保持一致
1
2
3
4
5
6
curl -X POST "http://36.251.185.124:8000/v1/chat/completions" \ -H "Content-Type: application/json" \ -d '{ "model": "DeepSeek-R1-Distill-Qwen-32B", "messages": [{"role": "user", "content": "介绍下你自己"}] }'
参考文档