使用Helm在Kubernetes集群上安装Harbor

Harbor支持通过Docker compose和Helm Chart进行部署,本文主要介绍使用Helm在Kubernetes集群上安装Harbor的方法,并且官方提供了对应的Helm Chart。

Harbor简介


Harbor是一个开源的可信云原生注册表项目,用于存储、签名和扫描内容。Harbor通过添加用户通常需要的功能(例如安全性、身份和管理)来扩展了开源Docker Distribution。拥有更接近构建和运行环境的注册表可以提高图像传输效率。 Harbor支持在注册中心之间复制镜像,还提供高级安全功能,例如用户管理、访问控制和活动审计。

说明
Master分支正在进行大量开发,请使用其他稳定版本进行部署

功能特征


  • 云原生注册表:Harbor支持Docker镜像和Helm Charts,可用作容器运行时和编排平台等云原生环境的注册表。
  • 基于角色的访问控制:用户通过“项目”访问不同的存储库,并且用户可以对项目下的Docker镜像或Helm Charts拥有不同的权限。
  • 基于策略的复制:可以使用过滤器(repository、tag、label)基于策略在多个注册表实例之间复制(同步)Docker镜像和Helm Charts。如果遇到任何错误,Harbor 会自动重试复制。这可用于协助负载平衡、实现高可用性,并促进混合云和多云场景中的多数据中心部署。
  • 漏洞扫描:Harbor定期扫描镜像以查找漏洞,并进行策略检查以防止部署易受攻击的镜像。
  • LDAP/AD支持:Harbor支持与现有企业LDAP/AD集成以进行用户身份验证和管理,并支持将LDAP组导入到Harbor中,然后可以为这些组授予特定项目的权限。
  • OIDC支持:Harbor利用OpenID Connect (OIDC)来验证通过外部授权服务器或身份提供商进行身份验证的用户身份。可以启用单点登录以登录Harbor门户。
  • 图像删除和垃圾收集:系统管理员可以运行垃圾收集作业,以便可以删除镜像(悬空清单和未引用的blob)并定期释放其空间。
  • Notary:支持使用Docker Content Trust(利用 Notary)对Docker镜像进行签名,以保证真实性和出处。此外,还可以激活阻止部署未签名映像的策略。
  • 图形用户门户:用户可以轻松浏览、搜索存储库和管理项目。
  • 审计:对存储库的所有操作都通过日志进行跟踪。
  • RESTful API:提供RESTful API以方便管理操作,并且易于与外部系统集成。嵌入式Swagger UI可用于探索和测试API。
  • 易于部署:Harbor可以通过Docker compose和Helm Chart进行部署,最近还添加了一个Harbor Operator。

架构图


先决条件


  • 一套Kubernetes集群
  • 在Kubernetes集群中已安装了Helm
  • 在Kubernetes集群中已安装了Ingress Controller(可选,如果Harbor要通过Ingress进行暴露的话)
  • 存在默认StorageClass,如NFS、Ceph等等

Harbor/Kubernetes/Helm版本兼容列表

后期发布新版本的兼容信息可在https://github.com/goharbor/harbor-helm#prerequisites查看

Harbor版本 对应Helm Chart版本 Kubernetes版本要求 Helm版本要求
1.7.x 1.0.x 1.10+ 2.8.0+
1.8.x 1.1.x 1.10+ 2.8.0+
1.9.x 1.2.x 1.10+ 2.8.0+
1.10.x 1.3.x 1.10+ 2.8.0+/3.0.0+
2.0.x 1.4.x 1.10+ 2.8.0+/3.0.0+
2.1.x 1.5.x 1.16+ 2.10.0+/3.0.0+
2.2.x 1.6.x 1.18+ 2.10.0+/3.0.0+
2.3.x 1.7.x 1.18+ 2.10.0+/3.0.0+

获取Harbor Chart


方法一

根据上面的Harbor/Kubernetes/Helm版本兼容列表 确定可部署的Harbor版本,然后在任意一台Master节点上执行如下命令添加Helm仓库,并拉取指定版本的Harbor Chart包

说明
我的Kubernetes集群是1.20.9版本的,因此拉取的是截止至2021.8.14最新的1.7.1的Harbor Chart包

1
2
3
4
5
6
cd /root
# 添加Helm仓库
helm repo add harbor https://helm.goharbor.io
# 拉取Harbor Chart包,可通过helm search repo -l harbor/harbor获取Harbor Chart包版本与Harbor的版本对应信息
helm fetch harbor/harbor --version v1.7.1 --untar
# 拉取完会在执行命令的当前目录下生成一个harbor目录,Harbor Chart包相关文件均在此目录中

方法二

根据上面的Harbor/Kubernetes/Helm版本兼容列表 确定可部署的Harbor版本,然后到Harbor Helm Chart Release页下载对应版本的最新Harbor Chart包并将其上传到任意一台Master节点的/root目录下,并执行如下命令解压。

说明
我的Kubernetes集群是1.20.9版本的,因此下载的是截止至2021.8.14最新的1.7.1的Harbor Chart包

1
2
3
cd /root
tar zxf harbor-helm-1.7.1.tar.gz
mv harbor-helm-1.7.1 harbor

配置Harbor Chart

根据注释结合实际环境情况修改values.yaml中的相关配置,可在此处查看Harbor Chart完整的可配置参数表。


1
2
3
4
5
6
7
8
9
10
11
12
13
14
15
16
17
18
19
20
21
22
23
24
25
26
27
28
29
30
31
32
33
34
35
36
37
38
39
40
41
42
43
44
45
46
47
48
49
50
51
52
53
54
55
56
57
58
59
60
61
62
63
64
65
66
67
68
69
70
71
72
73
74
75
76
77
78
79
80
81
82
83
84
85
86
87
88
89
90
91
92
93
94
95
96
97
98
99
100
101
102
103
104
105
106
107
108
109
110
111
112
113
114
115
116
117
118
119
120
121
122
123
124
125
126
127
128
129
130
131
132
133
134
135
136
137
138
139
140
141
142
143
144
145
146
147
148
149
150
151
152
153
154
155
156
157
158
159
160
161
162
163
164
165
166
167
168
169
170
171
172
173
174
175
176
177
178
179
180
181
182
183
184
185
186
187
188
189
190
191
192
193
194
195
196
197
198
199
200
201
202
203
204
205
206
207
208
209
210
211
212
213
214
215
216
217
218
219
220
221
222
223
224
225
226
227
228
229
230
231
232
233
234
235
236
237
238
239
240
241
242
243
244
245
246
247
248
249
250
251
252
253
254
255
256
257
258
259
260
261
262
263
264
265
266
267
268
269
270
271
272
273
274
275
276
277
278
279
280
281
282
283
284
285
286
287
288
289
290
291
292
293
294
295
296
297
298
299
300
301
302
303
304
305
306
307
308
309
310
311
312
313
314
315
316
317
318
319
320
321
322
323
324
325
326
327
328
329
330
331
332
333
334
335
336
337
338
339
340
341
342
343
344
345
346
347
348
349
350
351
352
353
354
355
356
357
358
359
360
361
362
363
364
365
366
367
368
369
370
371
372
373
374
375
376
377
378
379
380
381
382
383
384
385
386
387
388
389
390
391
392
393
394
395
396
397
398
399
400
401
402
403
404
405
406
407
408
409
410
411
412
413
414
415
416
417
418
419
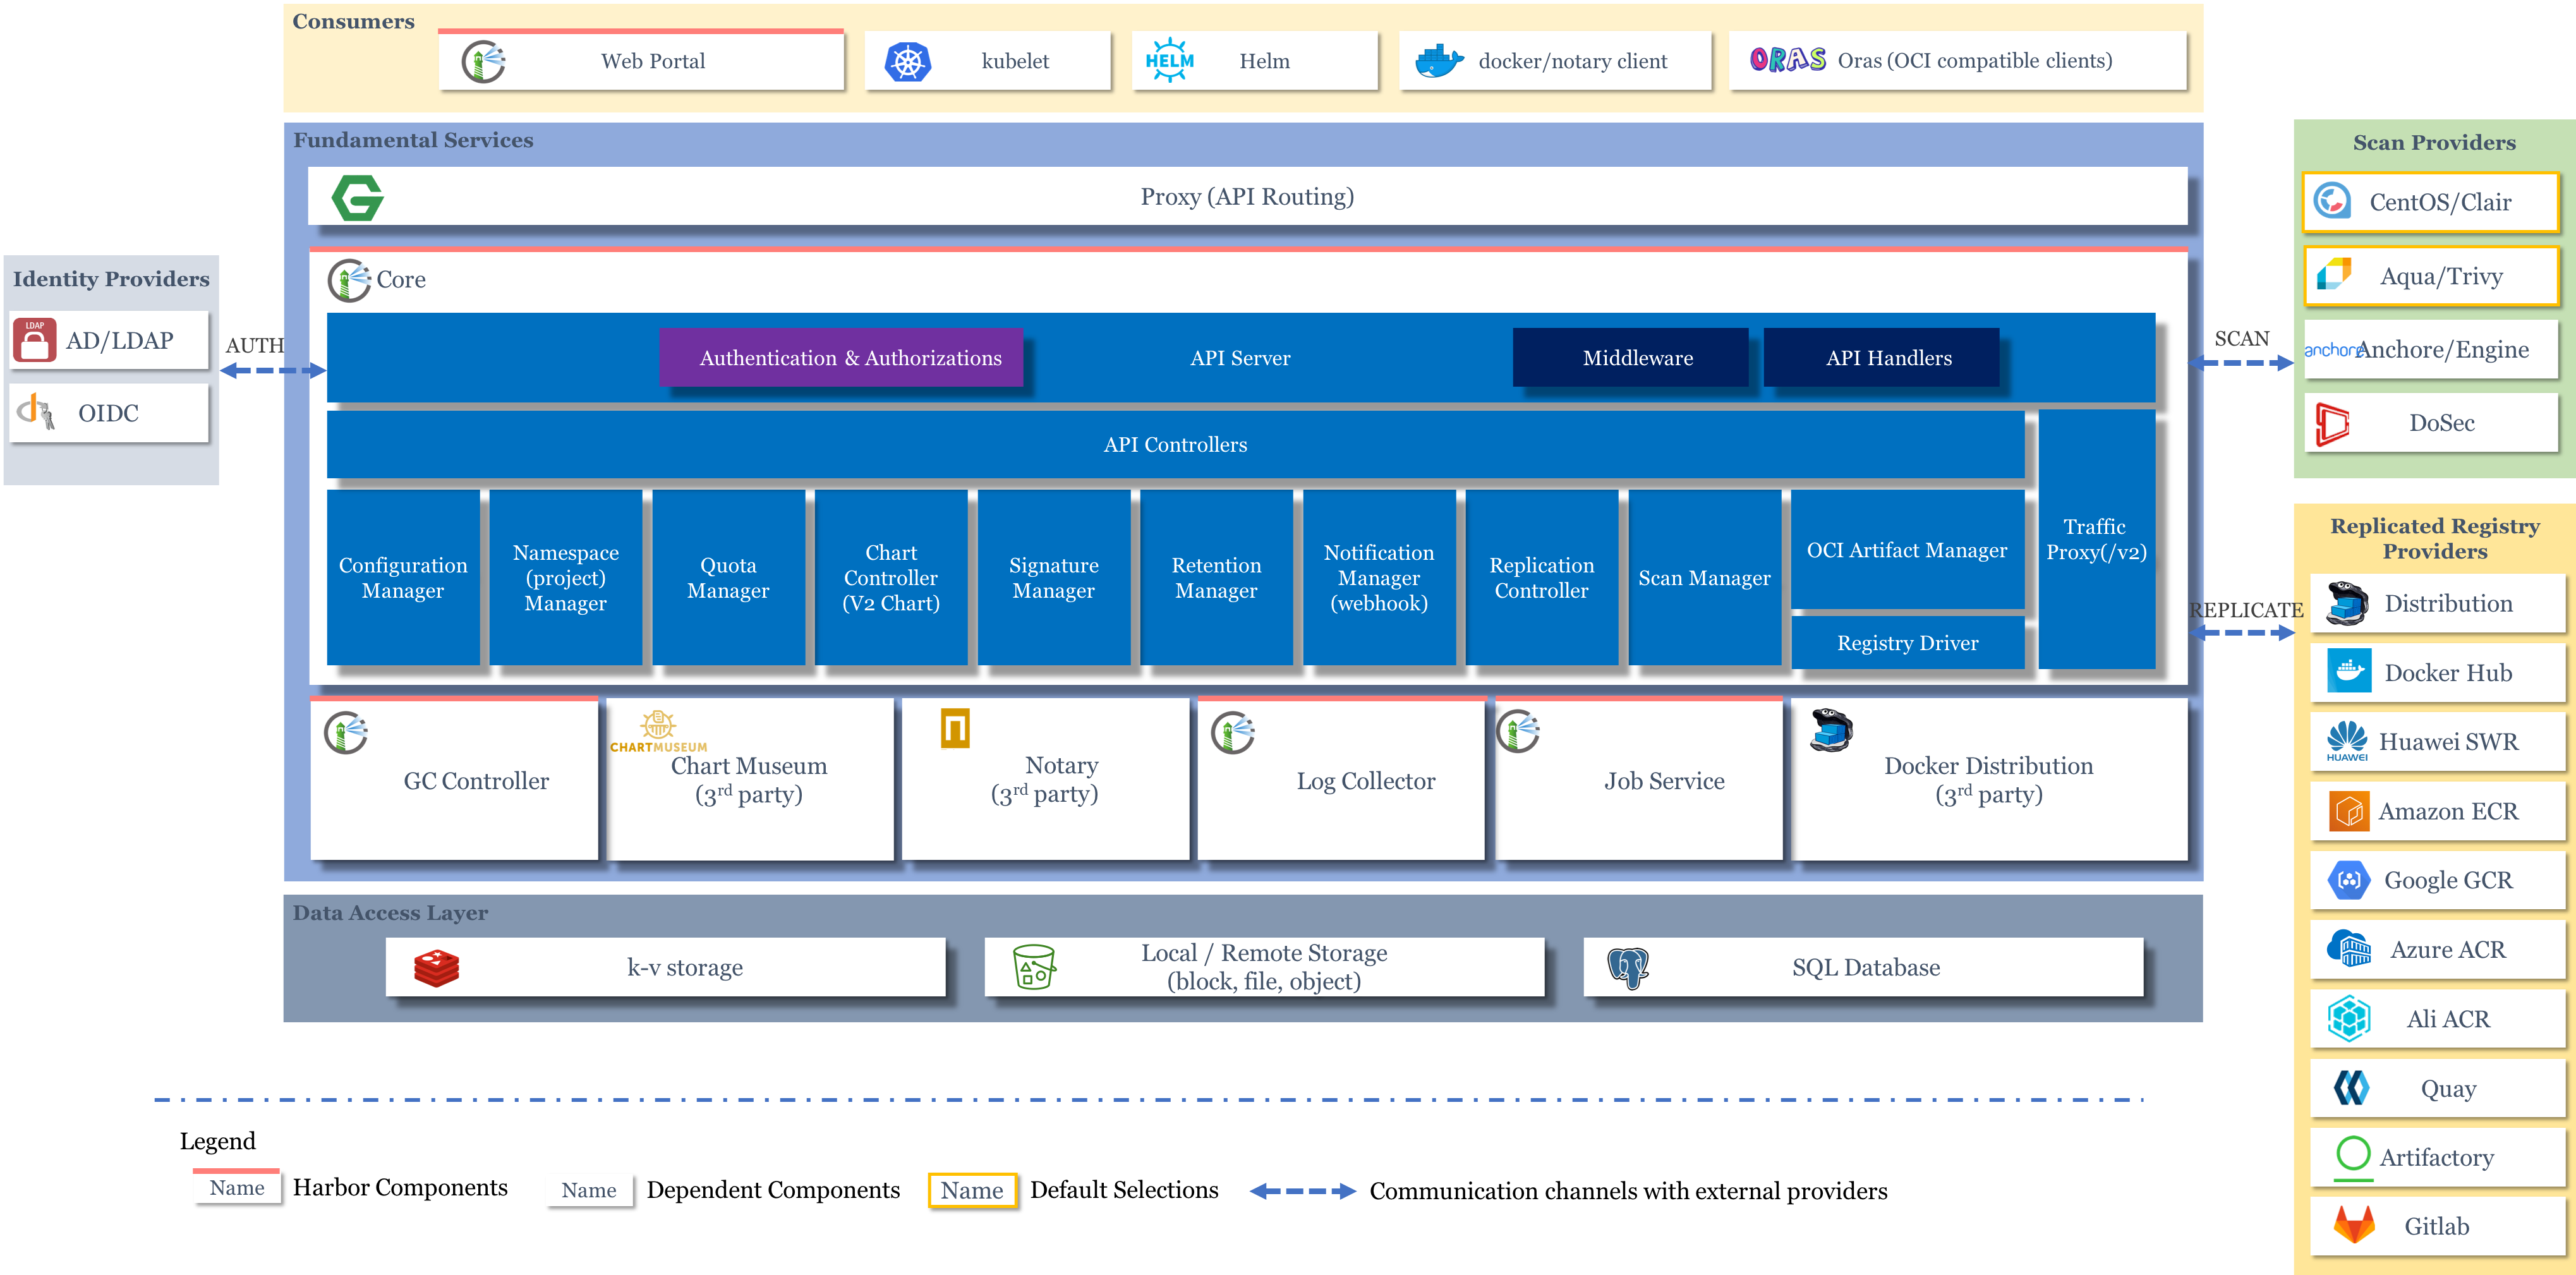
expose:
# Set the way how to expose the service. Set the type as "ingress",
# "clusterIP", "nodePort" or "loadBalancer" and fill the information
# in the corresponding section
# 设置暴露服务的方式。将类型设置为 ingress、clusterIP、nodePort、loadBalancer 并在相应的区域填写对应的信息
type: ingress
tls:
# Enable the tls or not.
# Delete the "ssl-redirect" annotations in "expose.ingress.annotations" when TLS is disabled and "expose.type" is "ingress"
# Note: if the "expose.type" is "ingress" and the tls
# is disabled, the port must be included in the command when pull/push
# images. Refer to https://github.com/goharbor/harbor/issues/5291
# for the detail.
# 是否开启 TLS
# 当 TLS 被禁用并且 expose.type 为 ingress 时,删除 expose.ingress.annotations 中的 ingress.kubernetes.io/ssl-redirect 注释项
# 注意:如果 expose.type 为 ingress 并且 TLS 被禁用,则在 pull/push 镜像时,服务端口必须包含在命令中。详情查看文档 https://github.com/goharbor/harbor/issues/5291
enabled: true
# The source of the tls certificate. Set it as "auto", "secret"
# or "none" and fill the information in the corresponding section
# 1) auto: generate the tls certificate automatically
# 2) secret: read the tls certificate from the specified secret.
# The tls certificate can be generated manually or by cert manager
# 3) none: configure no tls certificate for the ingress. If the default
# tls certificate is configured in the ingress controller, choose this option
# TLS 证书的来源。将其设置为 auto、secret 或 none 并在相应的区域填写对应的信息
# 1)auto:自动生成 TLS 证书
# 2)secret:从指定的 secret 中读取 TLS 证书,TLS 证书可以手动生成也可以由证书管理器生成
# 3)none:不为入口配置 TLS 证书。如果在入口控制器中配置了默认 TLS 证书,请选择此选项
certSource: auto
auto:
# The common name used to generate the certificate, it's necessary
# when the type isn't "ingress"
# 用于生成证书的通用名称,当 expose.type 不是 ingrss 时是必需的
commonName: ""
secret:
# The name of secret which contains keys named:
# "tls.crt" - the certificate
# "tls.key" - the private key
# secret 的名称,这个 secret 必须包含名为 tls.crt 的证书和名为 tls.key 的密钥文件
secretName: ""
# The name of secret which contains keys named:
# "tls.crt" - the certificate
# "tls.key" - the private key
# Only needed when the "expose.type" is "ingress".
# secret 的名称,这个 secret 必须包含名为 tls.crt 的证书和名为 tls.key 的密钥文件
# 仅当 expose.type 为 ingress 时才需要
notarySecretName: ""
ingress:
hosts:
# The host of Harbor core service in ingress rule
# Harbor core service 的 ingress 规则中的域名
core: harbor.koenli.net
# The host of Harbor Notary service in ingress rule
# Harbor Notary service ingress 规则中的域名
notary: notary.koenli.net
# set to the type of ingress controller if it has specific requirements.
# leave as `default` for most ingress controllers.
# set to `gce` if using the GCE ingress controller
# set to `ncp` if using the NCP (NSX-T Container Plugin) ingress controller
# 设置 ingress controller 的类型,对于大部分 ingress 控制器保留为 default 即可
# 当使用 GCE ingress控制器时,设置为 gce
# 当使用 NCP (NSX-T Container Plugin) ingress控制器时,设置为 ncp
controller: default
annotations:
# note different ingress controllers may require a different ssl-redirect annotation
# for Envoy, use ingress.kubernetes.io/force-ssl-redirect: "true" and remove the nginx lines below
# 注意:不同的 ingress 控制器可能需要不同的 SSL重定向注释
# 对于 Envoy,请使用 ingress.kubernetes.io/force-ssl-redirect: "true" 并删除下面的 nginx 行(nginx.ingress.kubernetes.io/ssl-redirect和nginx.ingress.kubernetes.io/proxy-body-size)
ingress.kubernetes.io/ssl-redirect: "true"
ingress.kubernetes.io/proxy-body-size: "0"
nginx.ingress.kubernetes.io/ssl-redirect: "true"
nginx.ingress.kubernetes.io/proxy-body-size: "0"
notary:
# notary-specific annotations
annotations: {}
harbor:
# harbor ingress-specific annotations
annotations: {}
clusterIP:
# The name of ClusterIP service
name: harbor
# Annotations on the ClusterIP service
annotations: {}
ports:
# The service port Harbor listens on when serving with HTTP
httpPort: 80
# The service port Harbor listens on when serving with HTTPS
httpsPort: 443
# The service port Notary listens on. Only needed when notary.enabled
# is set to true
notaryPort: 4443
nodePort:
# The name of NodePort service
name: harbor
ports:
http:
# The service port Harbor listens on when serving with HTTP
port: 80
# The node port Harbor listens on when serving with HTTP
nodePort: 30002
https:
# The service port Harbor listens on when serving with HTTPS
port: 443
# The node port Harbor listens on when serving with HTTPS
nodePort: 30003
# Only needed when notary.enabled is set to true
notary:
# The service port Notary listens on
port: 4443
# The node port Notary listens on
nodePort: 30004
loadBalancer:
# The name of LoadBalancer service
name: harbor
# Set the IP if the LoadBalancer supports assigning IP
IP: ""
ports:
# The service port Harbor listens on when serving with HTTP
httpPort: 80
# The service port Harbor listens on when serving with HTTPS
httpsPort: 443
# The service port Notary listens on. Only needed when notary.enabled
# is set to true
notaryPort: 4443
annotations: {}
sourceRanges: []

# The external URL for Harbor core service. It is used to
# 1) populate the docker/helm commands showed on portal
# 2) populate the token service URL returned to docker/notary client
#
# Format: protocol://domain[:port]. Usually:
# 1) if "expose.type" is "ingress", the "domain" should be
# the value of "expose.ingress.hosts.core"
# 2) if "expose.type" is "clusterIP", the "domain" should be
# the value of "expose.clusterIP.name"
# 3) if "expose.type" is "nodePort", the "domain" should be
# the IP address of k8s node
#
# If Harbor is deployed behind the proxy, set it as the URL of proxy

# Harbor核心服务外部访问URL。主要用于:
# 1) 补全portal页面上面显示的docker/helm命令
# 2) 补全返回给docker/notary客户端的token服务URL

# 格式:protocol://domain[:port]。
# 1) 如果 expose.type=ingress,"domain"的值就是 expose.ingress.hosts.core 的值
# 2) 如果 expose.type=clusterIP,"domain"的值就是 expose.clusterIP.name 的值
# 3) 如果 expose.type=nodePort,"domain"的值就是 k8s 节点的 IP 地址

# 如果在代理后面部署 Harbor,请将其设置为代理的 URL
externalURL: https://harbor.koenli.net

# The internal TLS used for harbor components secure communicating. In order to enable https
# in each components tls cert files need to provided in advance.
internalTLS:
# If internal TLS enabled
enabled: false
# There are three ways to provide tls
# 1) "auto" will generate cert automatically
# 2) "manual" need provide cert file manually in following value
# 3) "secret" internal certificates from secret
certSource: "auto"
# The content of trust ca, only available when `certSource` is "manual"
trustCa: ""
# core related cert configuration
core:
# secret name for core's tls certs
secretName: ""
# Content of core's TLS cert file, only available when `certSource` is "manual"
crt: ""
# Content of core's TLS key file, only available when `certSource` is "manual"
key: ""
# jobservice related cert configuration
jobservice:
# secret name for jobservice's tls certs
secretName: ""
# Content of jobservice's TLS key file, only available when `certSource` is "manual"
crt: ""
# Content of jobservice's TLS key file, only available when `certSource` is "manual"
key: ""
# registry related cert configuration
registry:
# secret name for registry's tls certs
secretName: ""
# Content of registry's TLS key file, only available when `certSource` is "manual"
crt: ""
# Content of registry's TLS key file, only available when `certSource` is "manual"
key: ""
# portal related cert configuration
portal:
# secret name for portal's tls certs
secretName: ""
# Content of portal's TLS key file, only available when `certSource` is "manual"
crt: ""
# Content of portal's TLS key file, only available when `certSource` is "manual"
key: ""
# chartmuseum related cert configuration
chartmuseum:
# secret name for chartmuseum's tls certs
secretName: ""
# Content of chartmuseum's TLS key file, only available when `certSource` is "manual"
crt: ""
# Content of chartmuseum's TLS key file, only available when `certSource` is "manual"
key: ""
# trivy related cert configuration
trivy:
# secret name for trivy's tls certs
secretName: ""
# Content of trivy's TLS key file, only available when `certSource` is "manual"
crt: ""
# Content of trivy's TLS key file, only available when `certSource` is "manual"
key: ""

# The persistence is enabled by default and a default StorageClass
# is needed in the k8s cluster to provision volumes dynamicly.
# Specify another StorageClass in the "storageClass" or set "existingClaim"
# if you have already existing persistent volumes to use
#
# For storing images and charts, you can also use "azure", "gcs", "s3",
# "swift" or "oss". Set it in the "imageChartStorage" section

# 默认情况下会启用持久化存储,K8S群集中需要一个默认的 StorageClass 来动态调配卷。
# 在 StorageClass 中指定另一个StorageClass,或者设置 existingClaim (如果已经存在要使用的持久卷)
# 为了存储 Docker镜像 和Charts,您还可以使用 azure、gcs、s3、swift 或 oss。在 imageChartStorage 部分进行设置
persistence:
enabled: true
# Setting it to "keep" to avoid removing PVCs during a helm delete
# operation. Leaving it empty will delete PVCs after the chart deleted
# (this does not apply for PVCs that are created for internal database
# and redis components, i.e. they are never deleted automatically)
# 将其设置为 keep,以避免在执行 helm 删除操作期间移除 PVC。保留为空将在 chart 被删除后删除 PVC
# 这不适用于为内部数据库和redis组件创建的 PVC,即它们不会自动删除
resourcePolicy: "keep"
persistentVolumeClaim:
registry:
# Use the existing PVC which must be created manually before bound,
# and specify the "subPath" if the PVC is shared with other components
# 使用已经存在的 PVC(必须在绑定前先手动创建),如果 PVC 与其他组件共享,请指定 subPath
existingClaim: ""
# Specify the "storageClass" used to provision the volume. Or the default
# StorageClass will be used(the default).
# Set it to "-" to disable dynamic provisioning
# 指定 storageClass 用于提供存储卷,或者使用默认的 StorageClass 对象,设置为“-”禁用动态供给
storageClass: ""
subPath: ""
accessMode: ReadWriteOnce
# 配置持久卷的容量大小
size: 5Gi
chartmuseum:
existingClaim: ""
storageClass: ""
subPath: ""
accessMode: ReadWriteOnce
size: 5Gi
jobservice:
existingClaim: ""
storageClass: ""
subPath: ""
accessMode: ReadWriteOnce
size: 1Gi
# If external database is used, the following settings for database will
# be ignored
# 如果使用外部的数据库服务,下面的设置将会被忽略
database:
existingClaim: ""
storageClass: ""
subPath: ""
accessMode: ReadWriteOnce
size: 1Gi
# If external Redis is used, the following settings for Redis will
# be ignored
# 如果使用外部的 Redis 服务,下面的设置将会被忽略
redis:
existingClaim: ""
storageClass: ""
subPath: ""
accessMode: ReadWriteOnce
size: 1Gi
trivy:
existingClaim: ""
storageClass: ""
subPath: ""
accessMode: ReadWriteOnce
size: 5Gi
# Define which storage backend is used for registry and chartmuseum to store
# images and charts. Refer to
# https://github.com/docker/distribution/blob/master/docs/configuration.md#storage
# for the detail.
# 定义使用什么存储后端来存储镜像和 chart 包,详细查看文档 https://github.com/docker/distribution/blob/master/docs/configuration.md#storage
imageChartStorage:
# Specify whether to disable `redirect` for images and chart storage, for
# backends which not supported it (such as using minio for `s3` storage type), please disable
# it. To disable redirects, simply set `disableredirect` to `true` instead.
# Refer to
# https://github.com/docker/distribution/blob/master/docs/configuration.md#redirect
# for the detail.
# 指定是否对镜像和 chart 包禁用重定向,对于一些不支持的后端(例如对于使用minio的S3存储),请禁用。要禁用重定向,只需将 disableredirect 改为 true。
# 详情查看文档 https://github.com/docker/distribution/blob/master/docs/configuration.md#redirect
disableredirect: false
# Specify the "caBundleSecretName" if the storage service uses a self-signed certificate.
# The secret must contain keys named "ca.crt" which will be injected into the trust store
# of registry's and chartmuseum's containers.
# caBundleSecretName:

# Specify the type of storage: "filesystem", "azure", "gcs", "s3", "swift",
# "oss" and fill the information needed in the corresponding section. The type
# must be "filesystem" if you want to use persistent volumes for registry
# and chartmuseum
# 指定存储类型为 filesystem, azure, gcs, s3, swift, oss并在相应的区域填写对应的信息
# 如果想使用持久卷则必须设置成 filesystem 类型
type: filesystem
filesystem:
rootdirectory: /storage
#maxthreads: 100
azure:
accountname: accountname
accountkey: base64encodedaccountkey
container: containername
#realm: core.windows.net
gcs:
bucket: bucketname
# The base64 encoded json file which contains the key
encodedkey: base64-encoded-json-key-file
#rootdirectory: /gcs/object/name/prefix
#chunksize: "5242880"
s3:
region: us-west-1
bucket: bucketname
#accesskey: awsaccesskey
#secretkey: awssecretkey
#regionendpoint: http://myobjects.local
#encrypt: false
#keyid: mykeyid
#secure: true
#skipverify: false
#v4auth: true
#chunksize: "5242880"
#rootdirectory: /s3/object/name/prefix
#storageclass: STANDARD
#multipartcopychunksize: "33554432"
#multipartcopymaxconcurrency: 100
#multipartcopythresholdsize: "33554432"
swift:
authurl: https://storage.myprovider.com/v3/auth
username: username
password: password
container: containername
#region: fr
#tenant: tenantname
#tenantid: tenantid
#domain: domainname
#domainid: domainid
#trustid: trustid
#insecureskipverify: false
#chunksize: 5M
#prefix:
#secretkey: secretkey
#accesskey: accesskey
#authversion: 3
#endpointtype: public
#tempurlcontainerkey: false
#tempurlmethods:
oss:
accesskeyid: accesskeyid
accesskeysecret: accesskeysecret
region: regionname
bucket: bucketname
#endpoint: endpoint
#internal: false
#encrypt: false
#secure: true
#chunksize: 10M
#rootdirectory: rootdirectory

# 配置镜像拉取策略
imagePullPolicy: IfNotPresent

# Use this set to assign a list of default pullSecrets
imagePullSecrets:
# - name: docker-registry-secret
# - name: internal-registry-secret

# The update strategy for deployments with persistent volumes(jobservice, registry
# and chartmuseum): "RollingUpdate" or "Recreate"
# Set it as "Recreate" when "RWM" for volumes isn't supported
# 设置具有持久卷的 Deployment(jobservice, registry和chartmuseum) 的更新策略为 RollingUpdate 或 Recreate,在使用的持久卷不支持 RWM 时设置为 Recreate
updateStrategy:
type: RollingUpdate

# debug, info, warning, error or fatal
# 日志级别
logLevel: info

# The initial password of Harbor admin. Change it from portal after launching Harbor
# 设置 admin 用户初始密码,Harbor 启动后可通过 Portal 修改该密码
harborAdminPassword: "Harbor12345"

# The name of the secret which contains key named "ca.crt". Setting this enables the
# download link on portal to download the certificate of CA when the certificate isn't
# generated automatically
caSecretName: ""

# The secret key used for encryption. Must be a string of 16 chars.
# 用于加密的一个 secret key,必须是一个16位的字符串
secretKey: "not-a-secure-key"

# The proxy settings for updating trivy vulnerabilities from the Internet and replicating
# artifacts from/to the registries that cannot be reached directly
proxy:
httpProxy:
httpsProxy:
noProxy: 127.0.0.1,localhost,.local,.internal
components:
- core
- jobservice
- trivy

...

安装Harbor Chart


创建harbor命名空间,并将Harbor安装在此命名空间中,release名称为my-harbor

说明
命名空间名称和release名称可自定义配置

1
kubectl create namespace harbor

Helm2

1
2
cd /root/harbor
helm install --name my-harbor -f values.yaml . --namespace harbor

Helm3

1
2
cd /root/harbor
helm install my-harbor -f values.yaml . --namespace harbor

执行安装命令后需稍作等待,待所有Pod均Running后就表示安装成功了,可通过以下命令查看harbor命名空间下的相关资源

1
2
3
4
5
6
7
8
9
10
11
12
13
14
15
16
17
18
19
20
21
22
23
24
25
26
27
28
29
30
31
32
33
34
35
36
37
38
39
40
41
42
43
44
45
46
47
48
49
50
51
52
53
54
55
56
57
58
59
60
61
62
63
64
# kubectl get pod -n harbor
NAME READY STATUS RESTARTS AGE
my-harbor-chartmuseum-676bcccbd-hmbzs 1/1 Running 0 7m30s
my-harbor-core-7fccc5949f-ngrnf 1/1 Running 0 7m30s
my-harbor-database-0 1/1 Running 0 7m30s
my-harbor-jobservice-77c8db6cc7-vqpct 1/1 Running 0 7m30s
my-harbor-notary-server-8d859d97-qgkdn 1/1 Running 0 7m30s
my-harbor-notary-signer-6fddc585df-m4c4f 1/1 Running 0 7m30s
my-harbor-portal-58f5956b6f-rv9nl 1/1 Running 0 7m30s
my-harbor-redis-0 1/1 Running 0 7m30s
my-harbor-registry-69cbc6fb99-j5t5k 2/2 Running 0 7m30s
my-harbor-trivy-0 1/1 Running 0 7m30s

# kubectl get deployment -n harbor
NAME READY UP-TO-DATE AVAILABLE AGE
my-harbor-chartmuseum 1/1 1 1 7m56s
my-harbor-core 1/1 1 1 7m56s
my-harbor-jobservice 1/1 1 1 7m56s
my-harbor-notary-server 1/1 1 1 7m56s
my-harbor-notary-signer 1/1 1 1 7m56s
my-harbor-portal 1/1 1 1 7m56s
my-harbor-registry 1/1 1 1 7m56s

# kubectl get statefulset -n harbor
NAME READY AGE
my-harbor-database 1/1 8m4s
my-harbor-redis 1/1 8m4s
my-harbor-trivy 1/1 8m4s

# kubectl get pvc -n harbor
NAME STATUS VOLUME CAPACITY ACCESS MODES STORAGECLASS AGE
data-my-harbor-redis-0 Bound pvc-5c4392bc-2257-427f-9d62-1a4abe888ef7 1Gi RWO managed-nfs-storage 8m23s
data-my-harbor-trivy-0 Bound pvc-92bde819-da80-47a7-82de-76ae0f32fb18 5Gi RWO managed-nfs-storage 8m23s
database-data-my-harbor-database-0 Bound pvc-f2213d41-5192-48ca-bc9c-e7e3a0530a79 1Gi RWO managed-nfs-storage 8m23s
my-harbor-chartmuseum Bound pvc-a4fbe416-f07c-4eef-b402-99b49122140a 5Gi RWO managed-nfs-storage 8m23s
my-harbor-jobservice Bound pvc-72c0ebe4-c81d-4f78-9f36-58908f664ca8 1Gi RWO managed-nfs-storage 8m23s
my-harbor-registry Bound pvc-ffeca7b3-4cd8-4d64-927d-95b1c6a9d812 5Gi RWO managed-nfs-storage 8m23s

# kubectl get pv -n harbor
NAME CAPACITY ACCESS MODES RECLAIM POLICY STATUS CLAIM STORAGECLASS REASON AGE
pvc-5c4392bc-2257-427f-9d62-1a4abe888ef7 1Gi RWO Delete Bound harbor/data-my-harbor-redis-0 managed-nfs-storage 8m24s
pvc-72c0ebe4-c81d-4f78-9f36-58908f664ca8 1Gi RWO Delete Bound harbor/my-harbor-jobservice managed-nfs-storage 8m25s
pvc-92bde819-da80-47a7-82de-76ae0f32fb18 5Gi RWO Delete Bound harbor/data-my-harbor-trivy-0 managed-nfs-storage 8m23s
pvc-a4fbe416-f07c-4eef-b402-99b49122140a 5Gi RWO Delete Bound harbor/my-harbor-chartmuseum managed-nfs-storage 8m25s
pvc-f2213d41-5192-48ca-bc9c-e7e3a0530a79 1Gi RWO Delete Bound harbor/database-data-my-harbor-database-0 managed-nfs-storage 8m24s
pvc-ffeca7b3-4cd8-4d64-927d-95b1c6a9d812 5Gi RWO Delete Bound harbor/my-harbor-registry managed-nfs-storage 8m25s

# kubectl get svc -n harbor
NAME TYPE CLUSTER-IP EXTERNAL-IP PORT(S) AGE
my-harbor-chartmuseum ClusterIP 10.0.0.147 <none> 80/TCP 9m18s
my-harbor-core ClusterIP 10.0.0.34 <none> 80/TCP 9m18s
my-harbor-database ClusterIP 10.0.0.67 <none> 5432/TCP 9m18s
my-harbor-jobservice ClusterIP 10.0.0.40 <none> 80/TCP 9m18s
my-harbor-notary-server ClusterIP 10.0.0.127 <none> 4443/TCP 9m18s
my-harbor-notary-signer ClusterIP 10.0.0.153 <none> 7899/TCP 9m18s
my-harbor-portal ClusterIP 10.0.0.209 <none> 80/TCP 9m18s
my-harbor-redis ClusterIP 10.0.0.131 <none> 6379/TCP 9m18s
my-harbor-registry ClusterIP 10.0.0.72 <none> 5000/TCP,8080/TCP 9m18s
my-harbor-trivy ClusterIP 10.0.0.168 <none> 8080/TCP 9m18s

# kubectl get ingress -n harbor
NAME CLASS HOSTS ADDRESS PORTS AGE
my-harbor-ingress <none> harbor.koenli.net 10.0.0.106 80, 443 9m24s
my-harbor-ingress-notary <none> notary.koenli.net 10.0.0.106 80, 443 9m24s

删除Harbor Chart


说明
注意修改harbor为实际命名空间名称

Helm2

1
2
3
4
helm delete --purge my-harbor
kubectl delete pvc -n harbor --all
kubectl delete pv -n harbor --all
kubectl delete namespace harbor

Helm3

1
2
3
4
helm uninstall my-harbor --namespace harbor
kubectl delete pvc -n harbor --all
kubectl delete pv -n harbor --all
kubectl delete namespace harbor

Portal访问


安装完成后即可尝试访问Harbor Portal,在访问之前,需先配置上述values.yaml文件中配置的两个域名的解析,将其解析到任意一个Ingress Controller的Pod所在的节点。如果配置的是公网域名,则可在域名注册商的域名控制台上配置解析,本文使用的是本地域名,直接在本地/etc/hosts文件中添加harbor.koenli.netnotary.koenli.net的解析

1
2
10.211.55.8	harbor.koenli.net
10.211.55.8 notary.koenli.net

访问https://harbor.koenli.net

说明
由于ingress配置了强制跳转到https,而自动生成的证书不受浏览器信任,第一次访问浏览器会出现类似如下安全风险提示,单击“继续前往harbor.koenli.net(不安全)”即可。
如果Chrome浏览器没有继续前往的按钮,直接在当前页面用键盘输入thisisunsafe ,注意不是在地址栏输入,直接敲键盘就行。因为Chrome浏览器不信任这些自签名SSL证书,为了安全起见,直接禁止访问。thisisunsafe这个命令,说明你已经了解并确认这是个不安全的网站,你仍要访问就给你访问了。

输入用户名:admin,默认密码:Harbor12345,单击“登录”

登录后会发现默认情况下会有一个名叫library的项目,该项目是公开访问权限的

单击”项目名称”可以看到里面可以对“镜像仓库”、“Helm Charts”等进行管理

在“配置管理”选项卡中可以对该项目里面的镜像进行一些配置,比如是否开启“自动扫描镜像”

Docker CLI登录仓库


HTTPS方式

安装完成后我们可以通过docker命令来推送和拉取镜像,在那之前我们需要先通过docker login登录镜像仓库,但此时登录镜像仓库的话会出现类似如下报错:

1
2
3
4
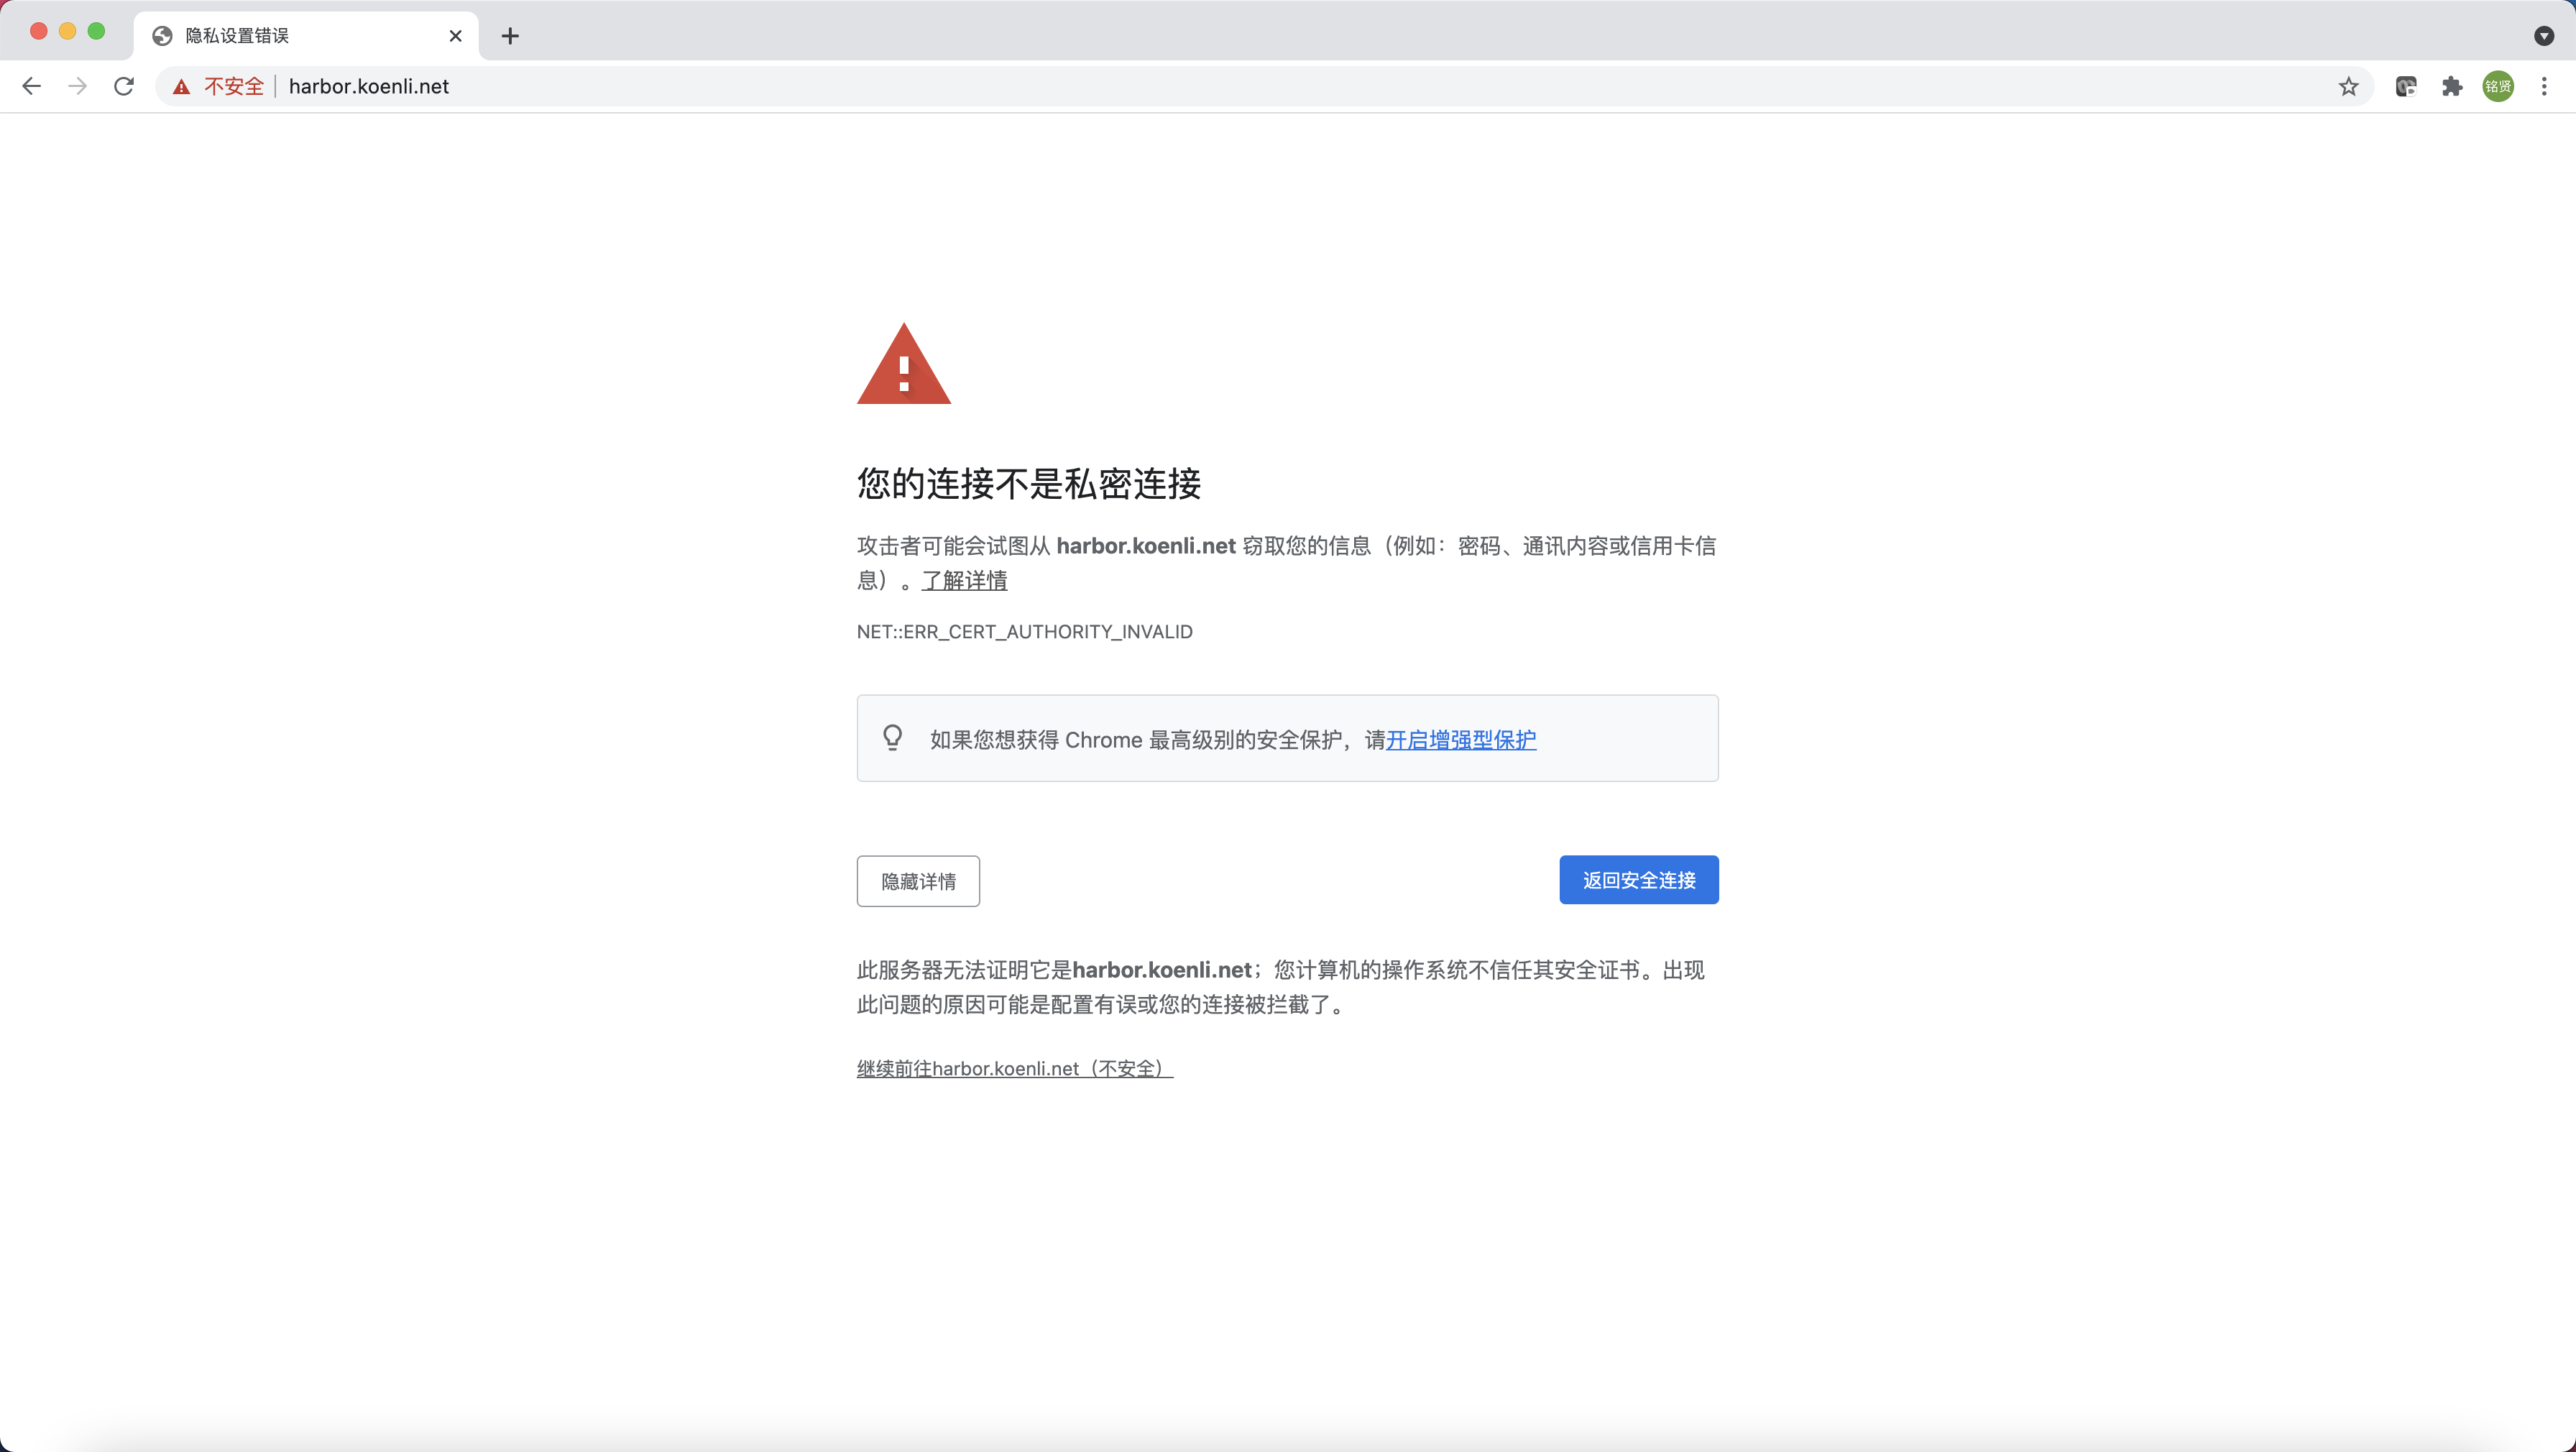
# docker login harbor.koenli.net
Username: admin
Password:
Error response from daemon: Get https://harbor.koenli.net/v2/: x509: certificate signed by unknown authority

这是因为docker login默认使用https去连接镜像仓库,而此时并没有提供证书文件,所以导致出现如上x509: certificate signed by unknown authority的报错。因此我们需要先在所有要访问镜像仓库的节点上创建存放证书文件的目录,默认路径为/etc/docker/certs.d/<registry.domain.name>,其中<registry.domain.name>为镜像仓库访问域名,在本文中即为harbor.koenli.net

1
mkdir -p /etc/docker/certs.d/harbor.koenli.net

然后在任意一台Master节点上执行如下命令获取ingress使用的secret资源对象信息

1
2
3
4
5
6
7
8
# 命名空间根据实际环境修改
# secret名称根据实际环境修改,命名格式为<releasename>-ingress
kubectl get secret -n harbor my-harbor-ingress -o yaml
apiVersion: v1
data:
ca.crt: LS0tLS1CRUdJTiBDRVJUSUZJQ0FURS0tLS0tCk1JSURGRENDQWZ5Z0F3SUJBZ0lSQU1wUGl0VEdsbW9FTUU4ODJ1bFNIRDB3RFFZSktvWklodmNOQVFFTEJRQXcKRkRFU01CQUdBMVVFQXhNSmFHRnlZbTl5TFdOaE1CNFhEVEl4TURneE5ERXpNakV4TVZvWERUSXlNRGd4TkRFegpNakV4TVZvd0ZERVNNQkFHQTFVRUF4TUphR0Z5WW05eUxXTmhNSUlCSWpBTkJna3Foa2lHOXcwQkFRRUZBQU9DCkFROEFNSUlCQ2dLQ0FRRUF5Yk9hNnpIblZIeGJNVmxkb1BmV3RSN0c0dUJMSWhGVmhUaU1EdzYxSXkyUCtITFUKMk5wVzRCUXhIRWk5aFFHTXd1SEx3UW9FQUphODRmUTRPc25la3JRR280bEp5V1pqUHVPZnpTcHltMDV0a1pQMAorbDZKbDJmckJESm9jYWxQT2pQQkllYTA5WC9GaU5SVW9Hb0RsN3VBajdkQmV0QXpIMkd0eWxWa3RUWWhqVCtqCmExZ3NiZ3Qycmt2S1FNSHlieHlsSWVKNmdGeFVFZlphQWtJVDFNNTRsYVRBRXg2U3B4eFFVcnEzamRBbGZ5UkIKRFlOaWVhQXVzRnBFT2VRajQ0dEtvVEV5d2VOdUIwdm5mSGJ6RTdQRmF3R1J6bElXeTVTeFZCajNSSlBNdXJndQpscXdTMTkvbVNqL0lueU5ZUk0xMlBtVk9rRjh4ZHBmQUdtYnJlUUlEQVFBQm8yRXdYekFPQmdOVkhROEJBZjhFCkJBTUNBcVF3SFFZRFZSMGxCQll3RkFZSUt3WUJCUVVIQXdFR0NDc0dBUVVGQndNQ01BOEdBMVVkRXdFQi93UUYKTUFNQkFmOHdIUVlEVlIwT0JCWUVGTmV6aUJNRngxTnljQW82aGRPbnRzL29HZXRqTUEwR0NTcUdTSWIzRFFFQgpDd1VBQTRJQkFRQm9Ob0pMRFlTangwYTB2eEZvNFdUR1B0QUlwOTNCYk16ZWVGemh6SjJBUzFlbkQrZXRsTjVCCkx2M2tLVVBwM1YvSkNJbk5tQTR2NHo0N3Y2cWlrNytESElwWjlaTzJRcS9CYTc1dVRmUnJIWGs1MGpLem9zNi8KWW1UVVV4VXhHajZzTWJnRDJYNXVhMFpiUVJDRGozZmdrTVJqdXVMaFpzRC85RE1saG9WSjNicDJQZWZJTXJrQwp1TUsrKzFVd0ZPRGlpWW0rRThRcTlpbUtvZ0NLZjVSblVYZFZsS0g4RTNGb25YaVZUYXo1N3Jmak1WSlk0QW1DCmpFM2xJTFNrdEtFbTdDOTFsZUFBRlhDS0FoODhDQXMzZVJjWEhCQ3VKZE9wRDlIMUw4TkprVFJwK2NxRFQwdGEKZGFNRmhWL1c5cWlkdXM4Q21seDBpaEtqUldqaEZKTjAKLS0tLS1FTkQgQ0VSVElGSUNBVEUtLS0tLQo=
tls.crt: LS0tLS1CRUdJTiBDRVJUSUZJQ0FURS0tLS0tCk1JSURUVENDQWpXZ0F3SUJBZ0lRYmRlc2l3WFhvdTBaMW5HRGdDeHdZakFOQmdrcWhraUc5dzBCQVFzRkFEQVUKTVJJd0VBWURWUVFERXdsb1lYSmliM0l0WTJFd0hoY05NakV3T0RFME1UTXlNVEV4V2hjTk1qSXdPREUwTVRNeQpNVEV4V2pBY01Sb3dHQVlEVlFRREV4Rm9ZWEppYjNJdWEyOWxibXhwTG01bGREQ0NBU0l3RFFZSktvWklodmNOCkFRRUJCUUFEZ2dFUEFEQ0NBUW9DZ2dFQkFNN25IMysrb3BlUE1KN2FLeXpBaDFqTlk5N21DSUdwTDZ4MTNwSXQKQXNVRDU3R0FTRWg0TzMveFhFQkFhWmVrcTlnNHVpR2F6d3R1bVprOU05TnFPc3BIdE9tZkk4bEJFZFpWT0UzTwovWW0rRUlWZmRZOWRJbzR2TzR4TklVeTV4aGN5WGE2UVA1Y2FRMklJaHVHa3h3RldiU1lKaVd6dHQrT3B0cXJMCkVJTlNUbTFqd1ZNU0h0VHJySnZESGJoWkowdmVNU1VpR1o3L3p2TE0wUStOcGtzNlBXU3pPSGFhNTVVbXhFcTMKVy9DY25yVi9TMUlwb3JjWFJQRDJTaUhHN1ZNVUQ1WmJQVUhlT2MxMCtXdnhZN0d6Z1d0Z3J3emZnWE9XOVN4dwoyaERvdENlSTJkZEhXQTFlaEpZN0pWRVRNTmFVTEljZHl5ZHd2YldId0RwQlZpY0NBd0VBQWFPQmtqQ0JqekFPCkJnTlZIUThCQWY4RUJBTUNCYUF3SFFZRFZSMGxCQll3RkFZSUt3WUJCUVVIQXdFR0NDc0dBUVVGQndNQ01Bd0cKQTFVZEV3RUIvd1FDTUFBd0h3WURWUjBqQkJnd0ZvQVUxN09JRXdYSFUzSndDanFGMDZlMnorZ1o2Mk13THdZRApWUjBSQkNnd0pvSVJhR0Z5WW05eUxtdHZaVzVzYVM1dVpYU0NFVzV2ZEdGeWVTNXJiMlZ1YkdrdWJtVjBNQTBHCkNTcUdTSWIzRFFFQkN3VUFBNElCQVFDZVBOcTVpdDJvVGZscWgrQnZCdEJOamljSlA5S0JJMXV5a1ZicXlHaWIKNHcwYkRzRUpsRmZYQ24xNEMzRjVSR2MxUmJDSHRSMHp5b2pyVlJGdmtPWXJQNDQwSXRKOXlXdmVOUmxqWFNqNgp4eDA3WC90MUhpRWwyRjFURGxZbVdaeHFFRWVtWENaNjBuazBIWjlweHRRYnpxQXNTdDhtdTFwb21PNXVsb2ZvCmpHWWlTQ25wSE55czR0eDVLTWVqT0NzZjF5U2hFTmhiMXRhaDFSL3FQQndKbGFaS3YxWEZYYjVWTFp1TmVVbm8KU1pSQXdhYUJvUENidVB1djJ0bFVNRUdSTnFHMWNkOG5VYlI3bE9PdmpGbjNpalF6QUtDMXlzQXJGekFneDk3cApPZDBHU282UHF6a0V0S2tvVHBHUWZBYkl4d1JEL0s4Y09QUC93eVNON1FQaQotLS0tLUVORCBDRVJUSUZJQ0FURS0tLS0tCg==
...

其中data区域中的ca.crt对应的值就是我们所需要的证书,复制其值然后通过base64进行解码并导入到/etc/docker/certs.d/<registry.domain.name>/ca.crt,其中<registry.domain.name>为镜像仓库访问域名,在本文中即为harbor.koenli.net

1
echo -n "LS0tLS1CRUdJTiBDRVJUSUZJQ0FURS0tLS0tCk1JSURGRENDQWZ5Z0F3SUJBZ0lSQU1wUGl0VEdsbW9FTUU4ODJ1bFNIRDB3RFFZSktvWklodmNOQVFFTEJRQXcKRkRFU01CQUdBMVVFQXhNSmFHRnlZbTl5TFdOaE1CNFhEVEl4TURneE5ERXpNakV4TVZvWERUSXlNRGd4TkRFegpNakV4TVZvd0ZERVNNQkFHQTFVRUF4TUphR0Z5WW05eUxXTmhNSUlCSWpBTkJna3Foa2lHOXcwQkFRRUZBQU9DCkFROEFNSUlCQ2dLQ0FRRUF5Yk9hNnpIblZIeGJNVmxkb1BmV3RSN0c0dUJMSWhGVmhUaU1EdzYxSXkyUCtITFUKMk5wVzRCUXhIRWk5aFFHTXd1SEx3UW9FQUphODRmUTRPc25la3JRR280bEp5V1pqUHVPZnpTcHltMDV0a1pQMAorbDZKbDJmckJESm9jYWxQT2pQQkllYTA5WC9GaU5SVW9Hb0RsN3VBajdkQmV0QXpIMkd0eWxWa3RUWWhqVCtqCmExZ3NiZ3Qycmt2S1FNSHlieHlsSWVKNmdGeFVFZlphQWtJVDFNNTRsYVRBRXg2U3B4eFFVcnEzamRBbGZ5UkIKRFlOaWVhQXVzRnBFT2VRajQ0dEtvVEV5d2VOdUIwdm5mSGJ6RTdQRmF3R1J6bElXeTVTeFZCajNSSlBNdXJndQpscXdTMTkvbVNqL0lueU5ZUk0xMlBtVk9rRjh4ZHBmQUdtYnJlUUlEQVFBQm8yRXdYekFPQmdOVkhROEJBZjhFCkJBTUNBcVF3SFFZRFZSMGxCQll3RkFZSUt3WUJCUVVIQXdFR0NDc0dBUVVGQndNQ01BOEdBMVVkRXdFQi93UUYKTUFNQkFmOHdIUVlEVlIwT0JCWUVGTmV6aUJNRngxTnljQW82aGRPbnRzL29HZXRqTUEwR0NTcUdTSWIzRFFFQgpDd1VBQTRJQkFRQm9Ob0pMRFlTangwYTB2eEZvNFdUR1B0QUlwOTNCYk16ZWVGemh6SjJBUzFlbkQrZXRsTjVCCkx2M2tLVVBwM1YvSkNJbk5tQTR2NHo0N3Y2cWlrNytESElwWjlaTzJRcS9CYTc1dVRmUnJIWGs1MGpLem9zNi8KWW1UVVV4VXhHajZzTWJnRDJYNXVhMFpiUVJDRGozZmdrTVJqdXVMaFpzRC85RE1saG9WSjNicDJQZWZJTXJrQwp1TUsrKzFVd0ZPRGlpWW0rRThRcTlpbUtvZ0NLZjVSblVYZFZsS0g4RTNGb25YaVZUYXo1N3Jmak1WSlk0QW1DCmpFM2xJTFNrdEtFbTdDOTFsZUFBRlhDS0FoODhDQXMzZVJjWEhCQ3VKZE9wRDlIMUw4TkprVFJwK2NxRFQwdGEKZGFNRmhWL1c5cWlkdXM4Q21seDBpaEtqUldqaEZKTjAKLS0tLS1FTkQgQ0VSVElGSUNBVEUtLS0tLQo=" | base64 -d > /etc/docker/certs.d/harbor.koenli.net/ca.crt

此时再次尝试通过docker login登录镜像仓库即可登录成功

1
2
3
4
5
6
7
8
# docker login harbor.koenli.net
Username: admin
Password:
WARNING! Your password will be stored unencrypted in /root/.docker/config.json.
Configure a credential helper to remove this warning. See
https://docs.docker.com/engine/reference/commandline/login/#credentials-store

Login Succeeded

HTTP方式

通过上面的介绍可以发现通过HTTPS的方式访问镜像仓库略显繁琐,因此我们也可以通过配置insecure-registry参数,以实现通过HTTP的方式进行访问。

编辑/etc/docker/daemon.json文件,新增insecure-registry参数,值为镜像仓库访问域名

说明
如果/etc/docker/daemon.json文件不存在新建一个即可

1
2
3
{
"insecure-registries": ["harbor.koenli.net"]
}

重新加载docker,使配置生效

1
systemctl reload docker

尝试登录镜像仓库

1
2
3
4
5
6
7
8
# docker login harbor.koenli.net
Username: admin
Password:
WARNING! Your password will be stored unencrypted in /root/.docker/config.json.
Configure a credential helper to remove this warning. See
https://docs.docker.com/engine/reference/commandline/login/#credentials-store

Login Succeeded

上传/拉取镜像


成功登录仓库后,即可通过docker push/pull上传或拉取镜像,以busybox:1.28.4镜像为例

上传镜像

上传镜像前需先给镜像打一个tag,增加一个<registry.domain.name>/<project>的前缀,然后推送的时候就可以识别出要将镜像推送到哪个仓库的哪个项目中了。

1
2
3
4
5
6
7
# docker image ls |grep busybox
busybox 1.28.4 8c811b4aec35 3 years ago 1.15MB
# docker tag busybox:1.28.4 harbor.koenli.net/library/busybox:1.28.4
# docker push harbor.koenli.net/library/busybox:1.28.4
The push refers to repository [harbor.koenli.net/library/busybox]
432b65032b94: Pushed
1.28.4: digest: sha256:74f634b1bc1bd74535d5209589734efbd44a25f4e2dc96d78784576a3eb5b335 size: 527

上传完成后刷新Portal页面就可以看到成功上传的镜像了。

拉取镜像

1
2
3
4
5
# docker pull harbor.koenli.net/library/busybox:1.28.4
1.28.4: Pulling from library/busybox
07a152489297: Pull complete
Digest: sha256:74f634b1bc1bd74535d5209589734efbd44a25f4e2dc96d78784576a3eb5b335
Status: Downloaded newer image for harbor.koenli.net/library/busybox:1.28.4